VFX Graph Optimization
Introduction
This documentation provides information to help you tackle performance issues while working with VFX Graph.
Getting Started
Within VFX Editor
For this section we are going to talk about things you could look into within and around your VFX graph that could be improved.
- Particle Count: Always start less, if you have a massive amount of particles, your lens could run slow on devices or even in Lens Studio. Examine the way you render your particle quads under the
Output Quadcontainer, try to eliminate any erosions, don’t cut out your quad and attempt to compensate for the look by adding more particles. Minimize the amount of invisible pixels both in your textures and final quads. Instead of adding more particles to make your VFX look fuller, you could also try to play withAttack Decaysub-graph to make particles bigger and more visible. Another thing you could do is to check where your particle positions are and how they move, try to have less overlapping so you can achieve a similar look but having a lower particle count. - Particle ( Kill ):
Discardnode doesn’t kill particles, You can useConditionalnode with the combination of particle life attribute at update or just simply use theParticle ( Kill )node. UtilizingParticle ( Kill )to remove particles that are too close to the camera could help you to reduce the number of overlapping. - Reduce overdraw: Overdrawn pixels means drawing the same pixels multiple times in the same frame. As mentioned above, users should avoid overlapping particles as much as possible for better performance. Imagine a stack of cards on top of each other, although you can’t see that one card on the bottom of the stack, the system still needs to draw it, which is unnecessary, so our goal here is to reduce unneeded particles.
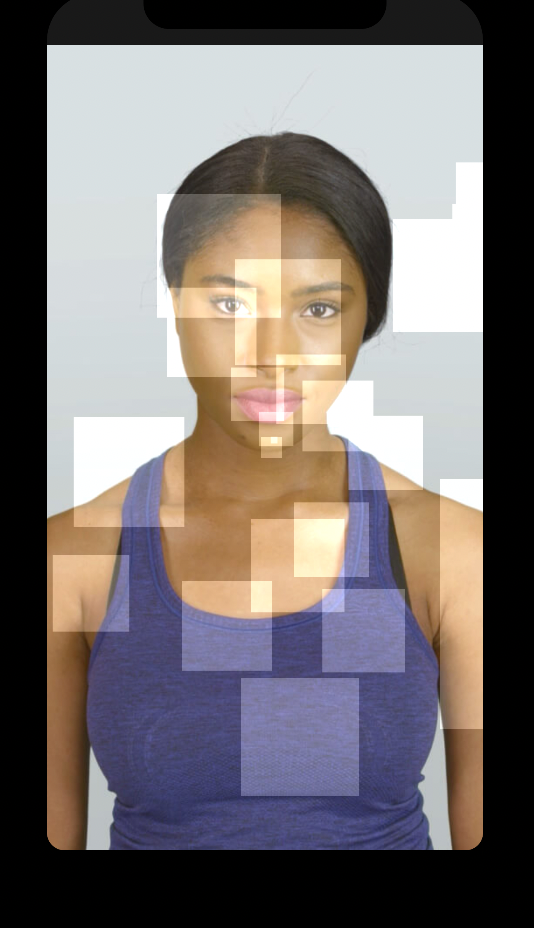
To check overdraw particles, you could set the Output Quad Blend Mode to Add, and set particle pixel color to (0.1, 0.1, 0.1, 1.0). As you can see below, there is a blown out area in the middle of the screen, the brighter the area indicates more overlapping is happening, which is not ideal. Smaller hotspots may be ok, large ones will hurt performance.
You may also place a black background behind the effect to make the overdraw view more exact. To change the background of the preview panel, click on the dropdown and select + From Files.

Below is a screenshot demonstrating a better scenario and what you should aim for to achieve better VFX performance.
- Check your textures: It could be costly using a high resolution texture such as 512x512 or above, if you use a high resolution texture on particles that are tiny and will never get too close to the camera, it means you are using a texture with too many details that no one will ever see on a phone screen. Try to reduce textures to 256x256 or even lower like 128x128. Your goal is to have the size of the texture almost the same as the size of particles on screen. Mipmaps should be enabled to mitigate this, unless you are sure your textures are never minified.
- Avoid Custom Attributes: When it’s possible to calculate something directly (ex: based on elapsed time rather than delta time).
Custom Attributesneed space allocated in the simulation buffers, and read and written several times per frame, so they can be more costly than evaluating some simple math. - Avoid excessive use of Particle Random: Try to avoid using
Particle Randomin theOutput Quadcontainer, this will cause rand() to be called for every pixel for every particle.
Instead, use an existing attribute whenever possible. The first choice should be Particle ( Get Attribute )- . This is the unique seed assigned to each particle at spawn. You can use this to drive the Ratio input of a Mix node to get a blend between two values. Next, you could try the same thing except using Particle ( Get Attribute ) - Index Ratio. Index Ratio is the particle ID/particle count, so it is a 0-1 value that increases linearly for each new particle that's spawned. If your particle system has a bunch of particles flying everywhere and it's hard to tell what order they start in, this attribute can effectively serve as a random number.
Besides VFX
Something else could also living in your project affecting the performance but not VFX related, let’s take a look:
- Textures: Once again, check the resolution of all the textures being used in your project, and reconsider whether you can resize them to be smaller. In Lens Studio no texture should exceed 2048 x 2048 resolution.
- Meshes: We encourage users to keep models in an average budget of 10,000 triangles for best performance on most of the devices. Lens Studio will not allow you to import a model that has more than 65,535 vertices. Each object you add to your project has an impact on performance. If you need to push beyond this, you'll see a significant lag on the performance.
- Script: When writing scripts, try to tie logic to events rather than Frame Update. Only use the script update event if you're unable to get the desired functionality from the other events available.
- Blend Modes: Blending is relatively more expensive operation than opaque or alpha tested rendering because it introduces GPU synchronization with previously rendered fragments into framebuffers, double check any blend modes being used or any Blend node within either Material or VFX Graph. Using “Disabled” Blend Mode can also improve overdraw issues.
Related Guides
Please refer to the guides below for additional information: