Text To Speech
This guide covers the bigger concepts about how Text To Speech (TTS) works in Lens Studio and Snapchat.
Currently TTS supports US English with two voices, six different voice styles for both voices and the ability to tweak the pace of TTS speech playback. Phoneme Info supports 12 different mouth shapes for 2D Animation. With Auto Voice Style Selector, the voice style will change based on the context.
This guide will teach you how to set up an example from scratch.
Check out a ready-to-go Text To Speech Example in Lens Studio Asset Library. Import the asset to your project, create new Orthographic camera and place the prefab under it.
Also try the 2D Animated TTS sample project for examples of using Phoneme in Lens Studio! It is available on Lens Studio Home Page.
Text To Speech
Scripting
In the Asset Browser panel, select + -> JavaScript File. Drag the script from Asset Browser to Scene Hierarchy to create scene object with script attached.
Double click on script to open for editing and add next lines to reference Text To Speech Module and Audio Component:
const TTS = require('LensStudio:TextToSpeechModule');
Audio Component
Next let's add an Audio Component to play the synthesized audio from the Text to Speech Module.
-
To Go back to the Inspector panel, then click on Add Component and select Audio Component.

-
Add new script input to reference this component.
// @input Component.AudioComponent audio -
Set script input with audio component.

TTS will generate an AudioTrackAsset, which can be played using Audio Component we just created.
Options
We use the option object to configure Text To Speech Module. To create options:
var options = TextToSpeech.Options.create();
Voice Name
You can define the voice name with options. TTS supports two voices: Sasha and Sam. The default voice will be TextToSpeech.VoiceNames.Sasha.
options.voiceName = TextToSpeech.VoiceNames.Sasha;
Voice Style
You can define the voice styles with options. TTS supports six voice styles for Sasha and Sam.
options.voiceStyle = TextToSpeech.VoiceStyles.One;
Automatic Voice Style Selector
You can also use the Automatic Voice Styles Selector. With Auto Style Selector, the voice style will change based on the context.
options.voiceStyle = TextToSpeech.VoiceStyles.Auto;
Voice Pace
You can define the voice pace with options. TTS supports playback speed: 75 = 0.75X, 100 = 1X, 125 = 1.25X, 150 = 1.5X.
options.voicePace = 100;
Callbacks
Let's define functions to handle successful or unsuccessful audio synthesis.
OnTTSCompleteHandler: will be called once the audio generation is completed, and receives two parameters: Audio Track Asset, WordInfos, PhonemeInfos and Voice Style.
var onTTSCompleteHandler = function(audioTrackAsset, wordInfos, phonemeInfos, voiceStyle) {
...
};
OnTTSErrorHandler: will be called if there is an error: receives a message of the error code and its description.
var onTTSErrorHandler = function (error, description) {
  print('Error: ' + error + ' Description: ' + description);
};
Generate AudioTrack Asset
var text = 'show me you love cats, without telling me you love cats!';
TTS.synthesize(text, options, onTTSCompleteHandler, onTTSErrorHandler);
Text Input supports text in English only. Non-English characters will be stripped.
Play Audio
Once the audio generation is successfully completed, the OnTTSCompleteHandler will be called. We can get TTS Audio Track Asset. Then we can play the TTS Audio Track Asset with the Audio Component.
var onTTSCompleteHandler = function (
  audioTrackAsset,
  wordInfos,
  phonemeInfos,
  voiceStyle
) {
  print('TTS Success');
  script.audio.audioTrack = audioTrackAsset;
  script.audio.play(1);
};
Now save the script, and reset the Preview panel. We can then see the “TTS Success” in the logger, as well as hear the TTS Audio playing.

Word Infos
In addition to the TTS Audio Track Asset, we can also get word infos for timing details for how the words are pronounced by the synthesized voice.
var onTTSCompleteHandler = function (
  audioTrackAsset,
  wordInfos,
  phonemeInfos,
  voiceStyle
) {
  print('TTS Success');
  script.audio.audioTrack = audioTrackAsset;
  script.audio.play(1);
  for (var i = 0; i < wordInfos.length; i++) {
    print(
      'word: ' +
        wordInfos[i].word +
        ', startTime: ' +
        wordInfos[i].startTime.toString() +
        ', endTime: ' +
        wordInfos[i].endTime.toString()
    );
  }
};
Now save the script, and reset the Preview panel. We can then see the word infos in the Logger panel.
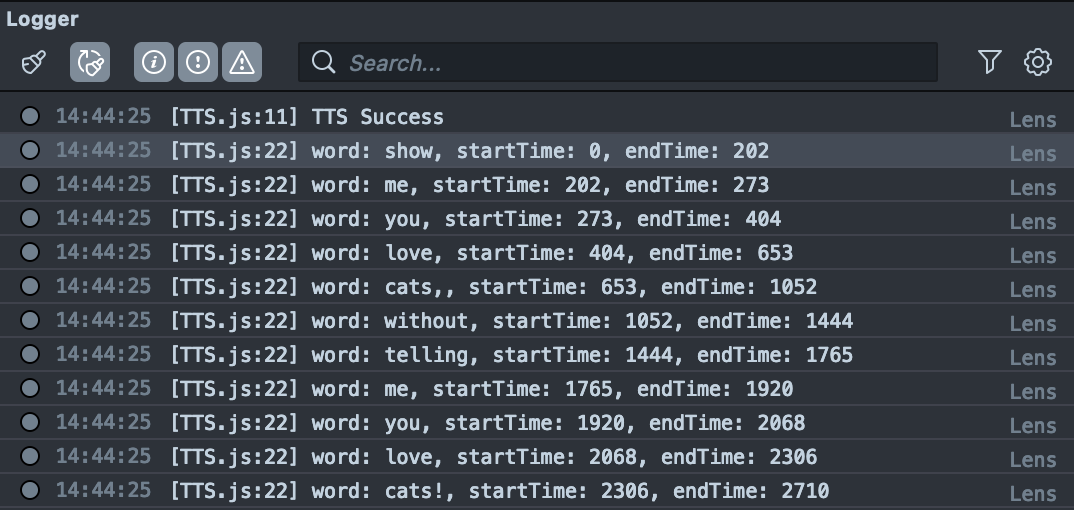
The words the synthesized audio was generated for (as text might be expanded during the synthesize process, there might be a slight variation between the input text and the words returned).
The time information in the Start Time and the End Time is in milliseconds when the word started/ended in the audio.
Phoneme Infos
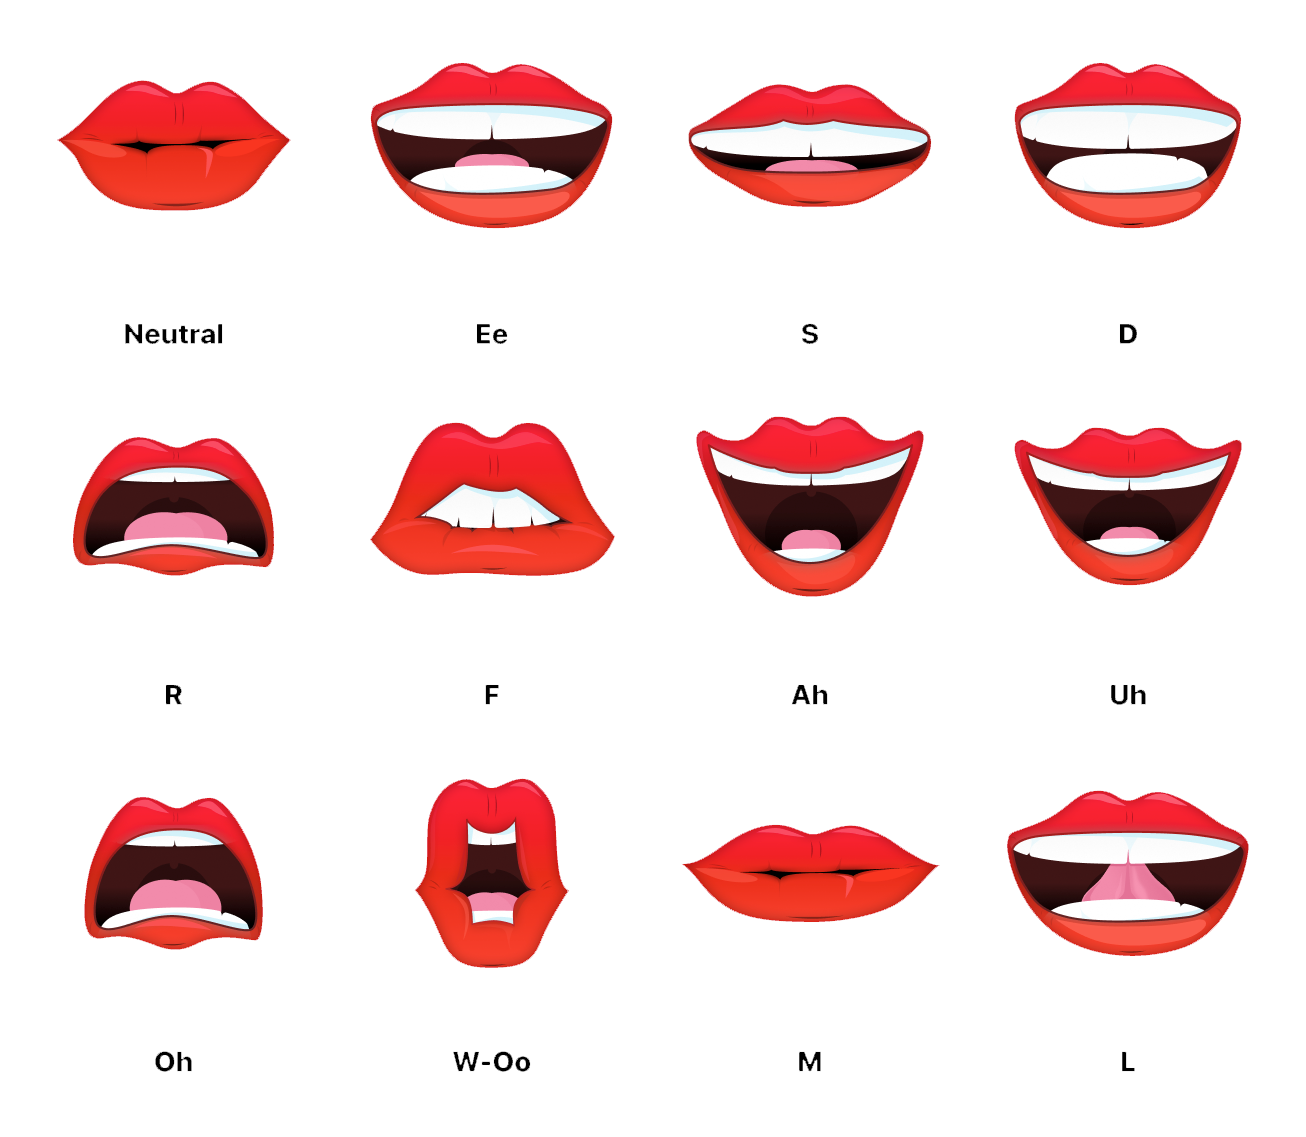
The TTS module allows you to obtain additional information about phonemes, enabling the creation of talking animations. Currently Phoneme supports 12 different mouth shapes. Let's set up a simple talking animation using a set of images. To do this:
-
In the script add an Image Component input:
// @input Component.Image image -
Add new
Screen Imagein theScene Hierarchypanel and set an Image input of our script compomnent: -
Add
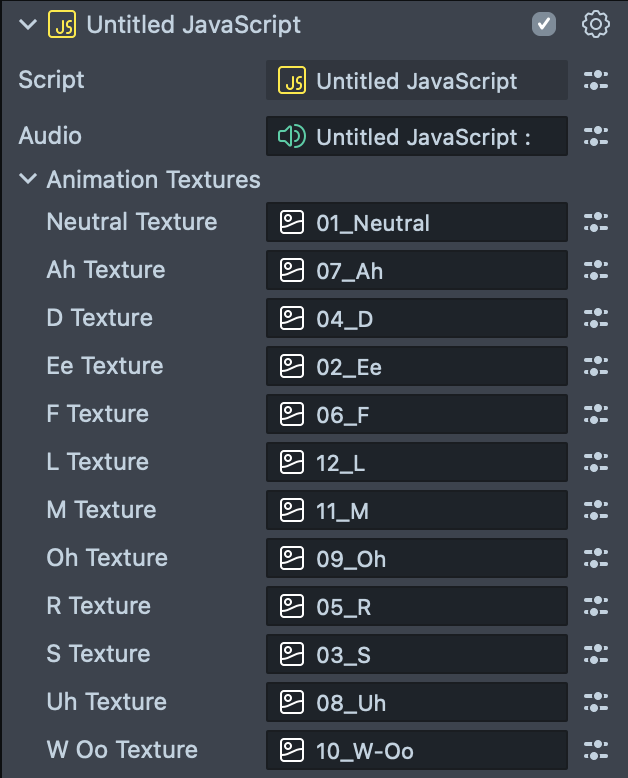
Textureinputs to the script:// @ui {"widget":"group_start", "label":"Animation Textures"}
// @input Asset.Texture neutralTexture
// @input Asset.Texture ahTexture
// @input Asset.Texture dTexture
// @input Asset.Texture eeTexture
// @input Asset.Texture fTexture
// @input Asset.Texture lTexture
// @input Asset.Texture mTexture
// @input Asset.Texture ohTexture
// @input Asset.Texture rTexture
// @input Asset.Texture sTexture
// @input Asset.Texture uhTexture
// @input Asset.Texture wOoTexture
// @ui {"widget":"group_end"}Prepare 12 mouth shape texture files, here is a reference that we'll be using:
-
Import textures to Lens Studio and set script inputs with corresponding mouth shape textures.
Let’s go back to the script to animate the textures based on phoneme info. Copy the next lines of code and add it to your script:
Click to expand the code
//Store textures to a texture array
var textures = [
  script.neutralTexture,
  script.wOoTexture,
  script.wOoTexture,
  script.dTexture,
  script.eeTexture,
  script.fTexture,
  script.lTexture,
  script.mTexture,
  script.ohTexture,
  script.rTexture,
  script.sTexture,
  script.wOoTexture,
  script.ahTexture,
  script.ahTexture,
  script.uhTexture,
  script.uhTexture,
];

//Store Phoneme Info
var timeline = [];

//TTS Audio State
var ttsStart = false;

//Current Phoneme Count
var currentPhonemeCount = 0;

//Map phoneme info to the texture index
var c2v = {
'!': 'neutral',
'?': 'neutral',
'.': 'neutral',
',': 'neutral',
' ': 'neutral',
'{@B}': 'm',
'{@CH}': 's',
'{@D}': 'd',
'{@DH}': 'd',
'{@DX}': 'oo1',
'{@EL}': 'l',
'{@EM}': 'm',
'{@EN}': 'd',
'{@F}': 'f',
'{@G}': 'd',
'{@HH}': 'e',
'{@H}': 'oo',
'{@JH}': 's',
'{@K}': 'd',
'{@L}': 'l',
'{@M}': 'm',
'{@N}': 'd',
'{@NG}': 'd',
'{@NX}': 'd',
'{@P}': 'm',
'{@Q}': 'd',
'{@R}': 'r',
'{@S}': 's',
'{@SH}': 's',
'{@T}': 'd',
'{@TH}': 'l',
'{@V}': 'f',
'{@W}': 'o',
'{@WH}': 'o',
'{@Y}': 'l',
'{@Z}': 's',
'{@ZH}': 's',
'{@AA0}': 'u1',
'{@AE0}': 'e',
'{@AH0}': 'u1',
'{@AO0}': 'a1',
'{@AW0}': 'o',
'{@AX0}': 'oo1',
'{@AXR0}': 'r',
'{@AY0}': 'e',
'{@EH0}': 'e',
'{@ER0}': 'e',
'{@EY0}': 'e',
'{@IH0}': 'u1',
'{@IX0}': 'e',
'{@IY0}': 'u1',
'{@OW0}': 'o',
'{@OY0}': 'o',
'{@UH0}': 'oo1',
'{@UW0}': 'u1',
'{@UX0}': 'u1',
'{@AA1}': 'u1',
'{@AE1}': 'e',
'{@AH1}': 'u1',
'{@AO1}': 'a1',
'{@AW1}': 'o',
'{@AX1}': 'oo1',
'{@AXR1}': 'r',
'{@AY1}': 'e',
'{@EH1}': 'e',
'{@ER1}': 'e',
'{@EY1}': 'e',
'{@IH1}': 'u1',
'{@IX1}': 'e',
'{@IY1}': 'u1',
'{@OW1}': 'o',
'{@OY1}': 'o',
'{@UH1}': 'oo1',
'{@UW1}': 'u1',
'{@UX1}': 'u1',
'{@AA2}': 'u1',
'{@AE2}': 'e',
'{@AH2}': 'u1',
'{@AO2}': 'a1',
'{@AW2}': 'o',
'{@AX2}': 'oo1',
'{@AXR2}': 'r',
'{@AY2}': 'e',
'{@EH2}': 'e',
'{@ER2}': 'e',
'{@EY2}': 'e',
'{@IH2}': 'u1',
'{@IX2}': 'e',
'{@IY2}': 'u1',
'{@OW2}': 'o',
'{@OY2}': 'o',
'{@UH2}': 'oo1',
'{@UW2}': 'u1',
'{@UX2}': 'u1',
};
var v2i = {
neutral: 0,
oo1: 1,
oo2: 2,
d: 3,
e: 4,
f: 5,
l: 6,
m: 7,
o: 8,
r: 9,
s: 10,
oo: 11,
a1: 12,
a2: 13,
u1: 14,
u2: 15,
};

var onTTSCompleteHandler = function (
audioTrackAsset,
wordInfos,
phonemeInfos,
voiceStyle
) {
print('TTS Success');
script.audio.audioTrack = audioTrackAsset;
script.audio.play(1);
for (var i = 0; i < wordInfos.length; i++) {
print(
'word: ' +
wordInfos[i].word +
', startTime: ' +
wordInfos[i].startTime.toString() +
', endTime: ' +
wordInfos[i].endTime.toString()
);
}
//Store Phoneme Infos to Timeline
timeline = [];
for (var i = 0; i < phonemeInfos.length; i++) {
timeline[i] = {
char: phonemeInfos[i].phoneme,
startTime: phonemeInfos[i].startTime,
endTime: phonemeInfos[i].endTime,
};
}
//Set TTS Audio Start to Play State to be true
ttsStart = true;

//Reset Current Phoneme Count
currentPhonemeCount = 0;
};

// Update Event triggered every frame.
script.createEvent('UpdateEvent').bind(function (eventData) {
if (!ttsStart) {
return;
}
// Current TTS Audio playback time in milliseconds
var currentTime = script.audio.position \* 1000;
// If TTS Audio starts to play
if (currentTime > 0) {
// Loop through the timeline array, if the current playback time is between phoneme start and end time, set the texture to map the current phoneme, then move to the next phoneme
for (var i = currentPhonemeCount; i < timeline.length; i++) {
if (
currentTime >= timeline[i].startTime &&
currentTime <= timeline[i].endTime
) {
print('-->' + timeline[i].char);
var texture = 0;
var currentChar = timeline[i].char;
if (/[^a-zA-Z]/.test(currentChar) === -1) {
texture = c2v[currentChar];
} else {
texture = v2i[c2v[currentChar]];
}
if (texture === undefined) {
texture = 0;
}
script.image.mainPass.baseTex = textures[texture];
currentPhonemeCount++;
break;
}
}
}
// If the it is almost the end of TTS Audio, reset the texture to neutral texture and TTS Audio State
if (currentTime >= timeline[timeline.length - 1].endTime - endTimeOffset) {
script.image.mainPass.baseTex = textures[v2i['neutral']];
ttsStart = false;
}
});
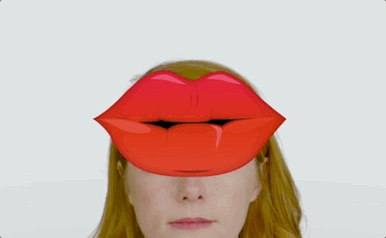
Now save the script, and reset the Preview panel. We can then see the phoneme infos in the Logger panel as well as animated mouth.
Please check out Animated TTS example!
Previewing Your Lens
You’re now ready to preview your Lens! To preview your Lens in Snapchat, follow the Pairing to Snapchat guide.
Don’t forget to turn on the sound on your device!