Developer Mode Using Visual Studio Code
This guide will walk you through setting up Lens Studio's MCP server with Visual Studio Code (VSCode), allowing you to use AI-powered tools to control Lens Studio directly from your code editor.
Agents and skills can accelerate your AI's ability to build a Lens. Take a look at CLAD for an example. These agents and skills are optimized for SPECS, but some of the core skills and agents will apply to any Lens Studio workflow (for example, scene building, scripting, and assets generation)
This guide is provided to support developers using Visual Studio Code, as we've seen its growing popularity across our developer community. For official VSCode MCP documentation, please refer to VSCode's MCP Documentation.
Prerequisites
- Visual Studio Code installed on your system
- Lens Studio installed on your system
- Chat Tool Package installed from Asset Library (see Adding Additional Tools)
Setup Steps
You can give VS Code access to the Lens Studio MCP server in two ways:
- Open the project directly: Open your Lens Studio project folder in VS Code. Lens Studio exposes the MCP server from that folder, so VS Code can connect automatically with no manual setup. See the Developer Mode overview for details.
- Copy the MCP config manually: Copy the configuration from Lens Studio and add it to VS Code yourself, as described below.
The MCP server is per Lens Studio window. You can open another Lens Studio window, save your project in a different location, and have your AI work on multiple projects simultaneously.
1. Create VSCode Configuration Folder
First, create a .vscode folder at the root of your project if it doesn't already exist.
mkdir .vscode
2. Create MCP Configuration File
Inside the .vscode folder, create a file named mcp.json:
touch .vscode/mcp.json
3. Start the MCP Server in Lens Studio
Go back to Lens Studio and start the MCP server:
-
Open the Lens Studio menu bar
-
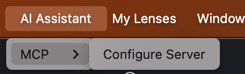
Click on AI Assistant > AI Model Context Protocol (MCP) > Configure Server
-
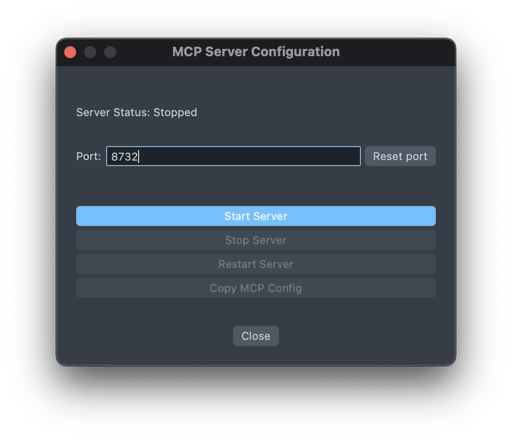
In the popup window, click Copy MCP Config
4. Copy the MCP Configuration
This will copy configuration details that look like this:
{
  "mcpServers": {
    "lens-studio": {
      "headers": {
        "Authorization": "Bearer [your-auth-token]"
      },
      "type": "http",
      "url": "http://localhost:50040/mcp"
    }
  }
}
5. Add Configuration to VSCode
Open the mcp.json file you created in the .vscode folder and paste the configuration.
The configuration copied from Lens Studio uses the mcpServers key. VS Code's mcp.json uses the servers key instead, so rename the top-level key to servers when you paste it in (as shown below).
If you already have other MCP servers configured:
Add the Lens Studio configuration to your existing servers object:
{
  "servers": {
    "existing-server": {
      "headers": {
        "Authorization": "Bearer your-existing-token"
      },
      "type": "http",
      "url": "your-existing-url"
    },
    "lens-studio": {
      "headers": {
        "Authorization": "Bearer [your-auth-token]"
      },
      "type": "http",
      "url": "http://localhost:50040/mcp"
    }
  }
}
If this is your first MCP server:
Your configuration will look like this:
{
  "servers": {
    "lens-studio": {
      "headers": {
        "Authorization": "Bearer [your-auth-token]"
      },
      "type": "http",
      "url": "http://localhost:50040/mcp"
    }
  }
}

6. Start the MCP Server in VSCode
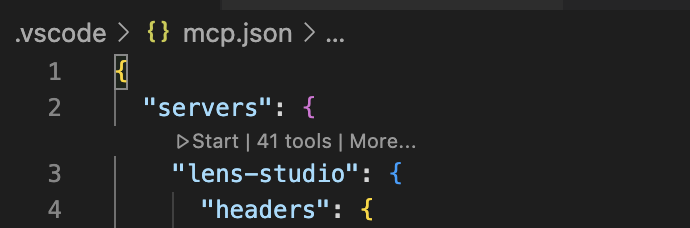
In VSCode, you'll see a "Start" text link appear just above your server configuration in the mcp.json file. Click this to start the MCP connection.
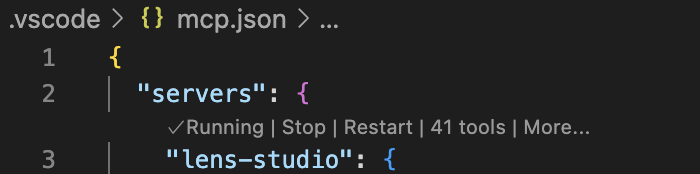
Once started, you should see confirmation that the server is running:
7. View Available MCP Tools
You can view the details of available Lens Studio MCP tools:
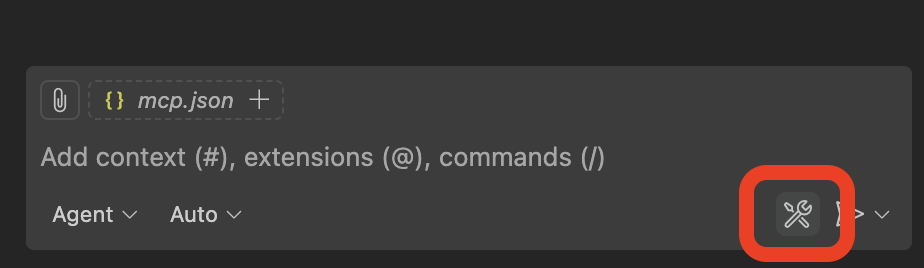
You can also see the full list of available tools by checking the MCP panel in VSCode:

8. Start Using Lens Studio with VSCode
Open the chat interface in VSCode and start interacting with your Lens Studio instance. Make sure your MCP server is still running in Lens Studio.
Here's an example of VSCode Chat using the Lens Studio MCP tools. Notice how the AI assistant calls various tools like GetLensStudioSceneGraph, CreateLensStudioSceneObject, and other MCP functions to interact with your Lens Studio project:
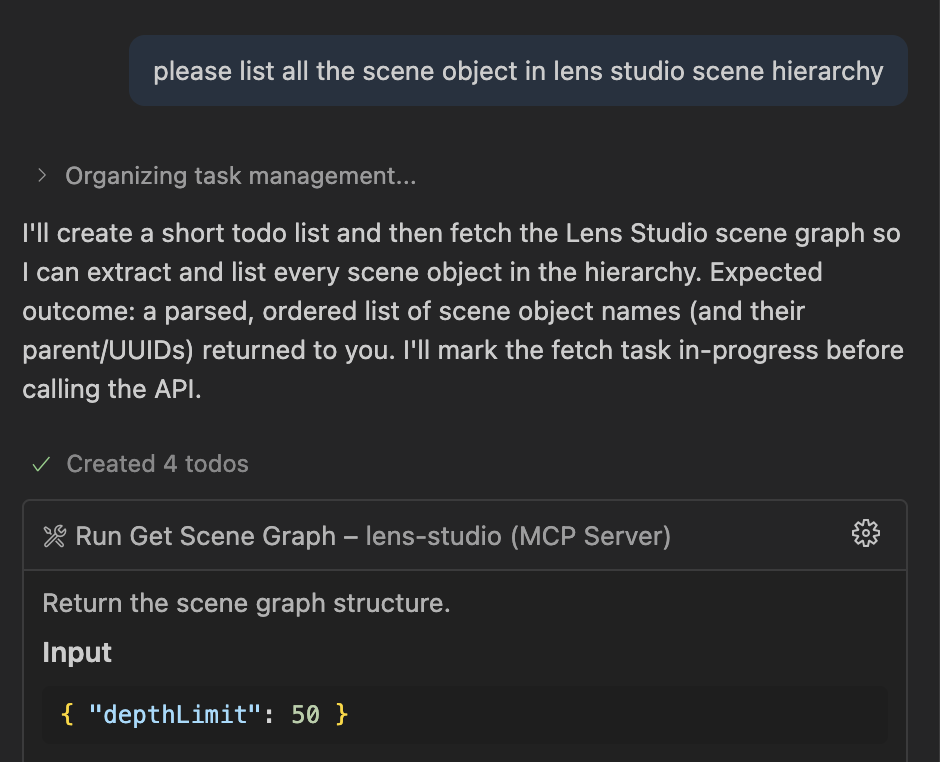
For optimal results, consider using the Example Prompt to help improve VSCode's performance with Lens Studio.
Using Chat Modes for Better Results
VSCode Chat Modes allow you to customize how the AI assistant behaves when working with your Lens Studio projects. By setting up chat modes, you can significantly improve the quality and relevance of the AI's responses.
What Are Chat Modes?
Chat Modes act as system prompts that guide the AI assistant to:
- Follow specific workflows - Force the AI to go through certain tasks in a particular order
- Consider project context - Direct the AI to look across specific context folders for relevant information
- Adopt a specific style - Define how the AI should structure and format its answers
- Understand Lens Studio specifics - Inform the AI about Lens Studio conventions, APIs, and best practices
This knowledge helps the AI deliver more accurate and relevant results tailored to your Lens Studio development workflow.
Setting Up Chat Modes
-
In your project root, create a
.githubfolder if it doesn't exist, then create achatmodesfolder inside it:mkdir -p .github/chatmodes -
In VSCode, you can configure and select your chat modes:

-
Create a new chat mode file (for example,
lens-studio.md) inside.github/chatmodes/: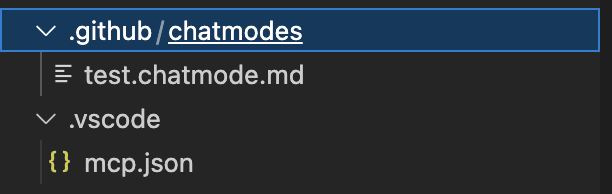
-
Add your custom rules that define how the AI should interact with your Lens Studio project. You can include information about:
- Lens Studio API conventions
- Your preferred coding style
- Common patterns in your project
- Specific workflows for Lens development
You can use the Example Prompt as a starting point for your Chat Mode. This prompt includes comprehensive guidelines for working with Lens Studio's TypeScript API and MCP tools.
Next Steps
Now that you've connected VSCode to Lens Studio, you can:
- Ask questions about your scene structure
- Request modifications to objects and components
- Generate scripts and add interactivity
- Debug issues in your project
- Search and install assets from the Asset Library
The MCP server must be running in Lens Studio for the connection to work. If you close Lens Studio or stop the server, you'll need to restart it and potentially update the authorization token in your VSCode configuration.