Fullscreen
You can find this sample project on the Lens Studio Home Page.
The Fullscreen example allows you to create a sequence of fullscreen states triggered by tap or time. A state is defined in the example by specifying which objects are shown and which animations and sounds are played at a given time. The example includes helpers such as a freeze frame effect (with different zoom levels), a tween system, and a way to hide Meshes or Images while recording.
Setup Resources and Objects
Importing 2D Content
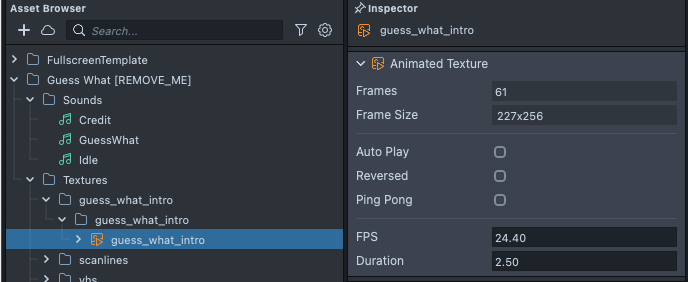
Once you have your 2D content exported, we can add it as a texture to Lens Studio by dragging and dropping the image/animations(s) into your Asset Browser panel. You can learn more about importing content in the 2D asset pipeline guide.
Importing Sounds
Similarly, we can add your sounds (we recommend mono channel MP3) to Lens Studio by dragging and dropping the sounds(s) into your Asset Browser panel. Learn more in the audio guide.
Creating a Screen Image
You can create a new Screen Image by pressing Add New -> Screen Image. Then, drag your imported texture from the Asset Browser panel to the Texture field in the Image Component of your new Screen Image object. You can learn more about Screen Image in our Image guide.
Setup States
Once you have several Screen Images, we can hook them up to different states to create our Lens.
Ordering States
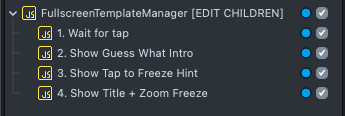
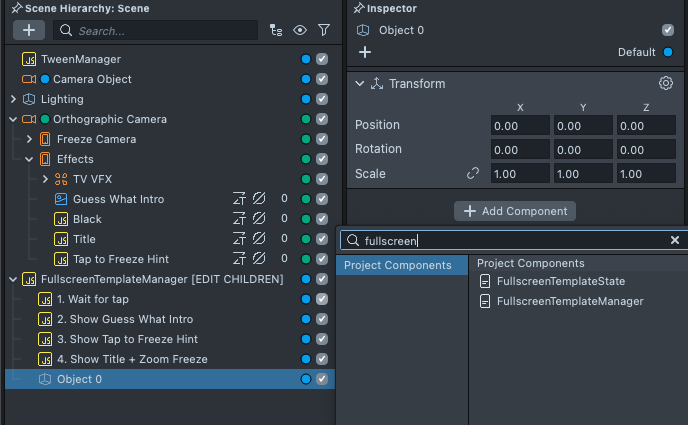
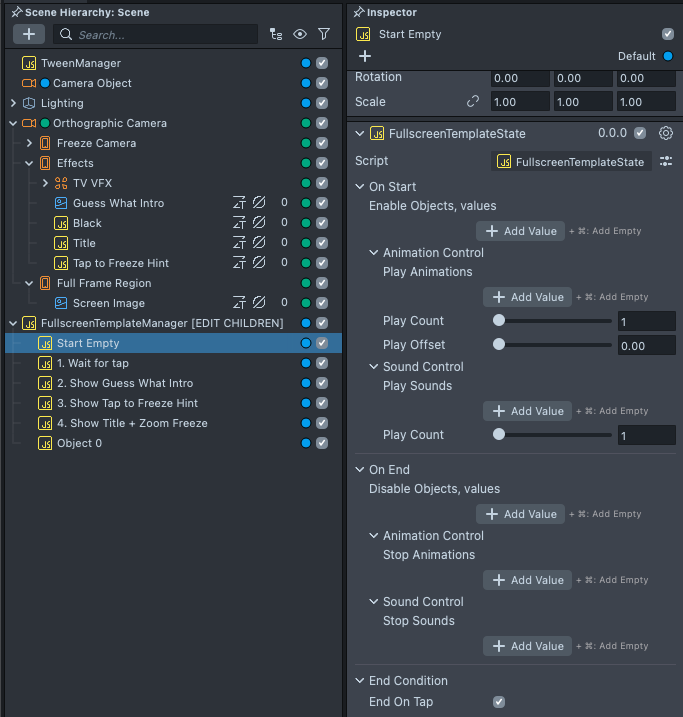
In the Scene Hierarchy panel, the FullscreenTemplateManager object contains children objects that represent each state of your Lens in the order they will appear (1st child being the 1st state, 2nd child being the 2nd state, and so on). When an end condition is met, the current state will end and the next one will begin.
Creating a State
A state is an empty child object of FullscreenTemplateManager with the script FullscreenTemplateState.
To create a new state, in the Scene Hierarchy panel, press + -> Scene Object. Then, in the Inspector panel, add the FullscreenTemplateState component.
Anatomy of a State
A state contains three section:
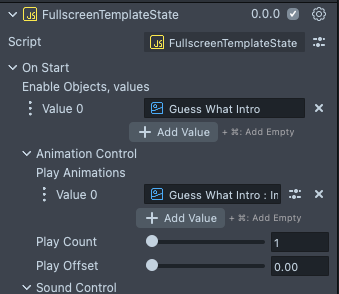
- On Start: called when the state is entered
- Here you can add objects you want to enable, add
Imagecomponents with animations you want to play, and audio files you want to play
- Here you can add objects you want to enable, add
- On End: called when the state is leaving
- Here you can add objects you want to disable, add
Imagecomponents with animations you want to stop, and audio files you want to stop
- Here you can add objects you want to disable, add
- End Condition: triggers the
On Endevent and leads to the next state being activated- Here you can choose what will cause the state to end and continue to the next state
- If there is an
End Conditionon the last state, it will lead back to the first state
Transitioning out of States
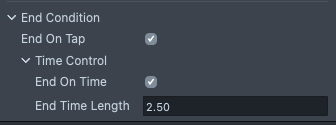
The End Condition section of a state allows you to specify when the Lens should proceed to the next state in the list. A state can be transitioned out by tapping, by time, or both:
End On TapEnd on Tapwill be triggered when the user taps anywhere on the screen- Double-tap and swipes will be passed to the main Snapchat app
End On Time- Will proceed to the next state after
End Time Lengthseconds has elapsed since the state was entered - If
End On Tapis also enabled, the user can “skip” theEnd Time Length
- Will proceed to the next state after
You can learn more about each field in the Script Interface section at the bottom of this guide.
State Examples
Showing an Object On Start
You can have objects show up when you enter a state by adding them to the Enable Objects list in the On Start section of the state.
Playing an Animation On Start
You can play an animation when you enter a state by adding it to the Play Animation list in the On Start section of the state.
Don’t forget to uncheck Always Play in the animation’s Inspector panel so it doesn’t start in the middle of the animation when you enter the state.
Disabling an Object On End
If you don’t want your Screen Image to stay visible in the next state, you can add it to the list of Disabled Objects in the On End section of the state.
Additional State Tips
Empty Start
You may want to start with a normal camera feed until the user taps. You can simply create an empty state with the option End On Tap checked as your first state.
Freeze frame
To freeze the camera feed when you enter a state: in the On Start section, add an object to the Enable Objects array. Choose: Orthographic Camera -> Effects -> Freeze Camera -> Freeze Camera. You can use 1x, 1.5x, 2x, 3x, depending on how zoomed in you want the frozen frame to be.
Delaying a State
To create a delay before activating the next state, we can add a new state in between the two states. In this between state, we can set its End Condition to End On Time and set the End Time Length to the delay length.

Additional Helper Functionality
Tweening with Tween Manager
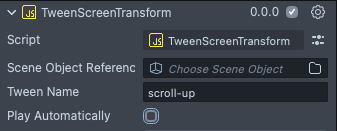
You can add animations to your Screen Image by using the included Tween Manager. In your Screen Image's Inspector panel select Add Component -> TweenScreenTransform. You can learn more about the Tween Manager in the Tweening guide.
In this example, the tween should only play when you enter a state. In order to do so, uncheck Play Automatically to prevent it from playing when the Lens opens, and name the tween so that we can reference it.
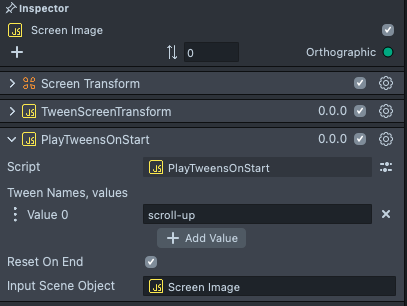
After adding all your tweens, we can add the PlayTweensOnStart script to play our tweens in series when we enter a state. To do this, press Add Component -> PlayTweensOnStart. Then add the name(s) of your tween(s) to the Tween Names field.
Hiding Hints
This example also includes a HideWhenRecording script. This is useful for when you want to provide hints to the user that won’t appear while the Lens is recording. To use it, select the object you want to hide, and in its Inspector panel, add a Script component: Add Component -> HideWhenRecording.
Previewing Your Lens
You're now ready to preview your world Lens experience. To preview your Lens in Snapchat, follow the Pairing to Snapchat guide.
Script Interface
FullscreenTemplateState.js
On StartEnable Objects (SceneObjects[])When a state starts these objects will be enabled. When the Lens opens, these objects will be disabled automatically- Animation Control
Play Animations (Component.SpriteVisual[])The BaseTex attached to these SpriteVisuals will be played based on the options belowPlay Count (number)How many times the sprites should be played when the state starts. -1 will loop the animation foreverPlay Offset (number)The sprites play offset in seconds
- Sound Control
Play Sounds (Asset.AudioTrackAsset[])The AudioTrackAsset attached from the Resource panel will automatically be given an AudioComponent accessible by any state and will be played when we enter the statePlay Count (number)How many times to play the sound when this state starts. -1 will loop the sound forever
On EndDisable Objects (SceneObjects[])When a state ends these objects will be disabled. When the Lens opens, these objects will be disabled automatically- Animation Control
Stop Animations (Component.SpriteVisual[])Stop the BaseTex attached to these SpriteVisuals when the state ends
- Sound Control
Stop Sounds (Asset.AudioTrackAsset[])Stop the attached AudioTrackAssets when the state ends
End ConditionEnd On Tap (bool)Whether the state should end when the user taps anywhere in the screen- Time Control
End On Time (bool)Whether the state should end when “End TIme Length” has elapsed since the state startedEnd Time Length (number)Max number of seconds that the current state will be active for
Custom Scripts in State
You can create your own custom logic attached to the state system by using the following API in your scripts:
script.api.onStart (function)Called when a state starts.script.api.onUpdate (function)Called while a state is active.script.api.onEnd (function)Called when a state ends.
FullscreenTemplateState.js will go through each object in its “Enable Objects” list and call these API functions on any Script components it finds. You can see an example of this in FreezeCameraOnStart.js or PlayTweensOnStart.js.
FreezeCameraOnStart.js
Freeze Camera (Component.Camera)The camera which should be disabled when the state starts, and enabled when the state ends. Disabling the camera will freeze the camera output texture to the last frame. This is used in conjunction with a Screen Image with the camera’s output as texture to freeze a frame
PlayTweensOnStart.js
This script allows you to hook the TweenSystem to each state. You can learn more about tweens in the Tweening guide.
Tween Names (String[])The names of the tweens on the current or specified Scene Object to be played one after the other when the state startsReset On End (Bool)Whether or not the object attached to the tween should be reset back to its start position at the end of the stateScene Object (SceneObject) (optional)The object that contains the tweens listed above. By default it is the current object
HideWhenRecording.js
This script will disable or enable any MeshVisual and/orSpriteVisual on the attached object when the user is recording a lens. This is useful for adding hints that you don’t want to appear while recording. It should be bound to Frame Updated.