Character Controller
The Character Controller Component is a modular, customizable movement system designed to support various gameplay formats, including third-person, first-person, side-scroller, and top-down style experiences. It provides a non-physics-based movement model with optional physics interactions, allowing for smooth, responsive controls without physics body dependencies. The Character Controller is designed for compatibility with Bitmoji 3D and custom characters.
Usage
- Quick Start with Template
- Bitmoji Player Package
- Manual Setup
The fastest way to get started with the Character Controller is using the Platformer Game Template, which includes a fully configured setup with:
- A controllable Bitmoji character with Character Controller
- Camera controller system
- Joystick input controls
- Leaderboard functionality
To access the template:
- Open the Lens Studio home screen
- In the 'I Want To Build For' section, select 'Snapchat'
- Scroll down and select 'Platformer Game Template'
For a ready-to-use solution, the Bitmoji Player Package provides a drag-and-drop Bitmoji player character that's pre-configured and customizable for different game formats. This package offers a complete integration of multiple components working together seamlessly.
What's Included:
The package includes a synergy of the following components:
- Character Controller: Movement system for the character
- Camera Controller: Camera system that follows the player
- Input Action: Input handling system
- Joystick: On-screen joystick for movement control
- Bitmoji 3D: The Bitmoji character with proper animation setup
Basic Setup:
The Bitmoji Player Package provides a basic setup with:
- A Bitmoji 3D character
- Joystick controls for movement
- A jump button
To install the Bitmoji Player Package:
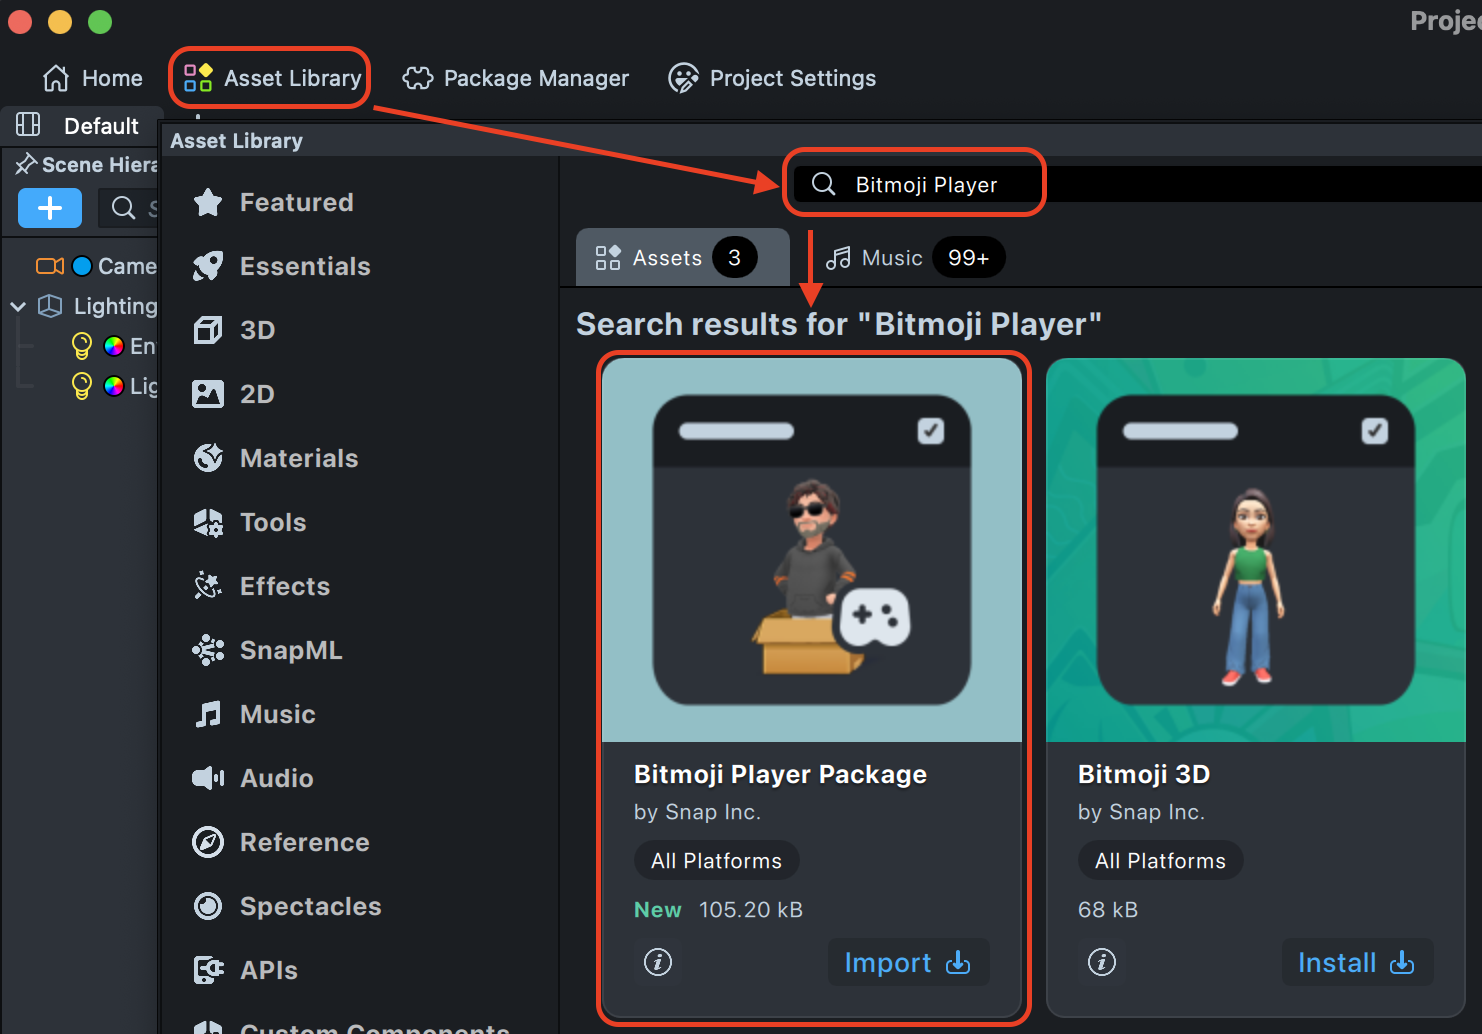
- Open the Asset Library in Lens Studio
- Navigate to the 'Games' section
- Find 'Bitmoji Player Package'
- Click 'Import' to add it to your project
Once imported, you can drag the package into your scene and customize the components to match your specific game requirements.
Follow these steps to add the Character Controller to your existing project:
1. Install the Character Controller
- Open the Asset Library in Lens Studio
- Search for Character Controller in the
Gamessection - Click Install to add the component to your Asset Browser
- Drag the Character Controller component into the scene or add it to an empty scene object
2. Add a Character
Add the Bitmoji 3D component as a child of the Character Controller object to use a Bitmoji character. Alternatively, you can use a custom character model.
Disable Adapt to Mixamo on the Bitmoji 3D component to use default movement animations.
Component Configuration
Once your Character Controller is set up, configure it through the Inspector panel to match your gameplay needs.
Movement Settings
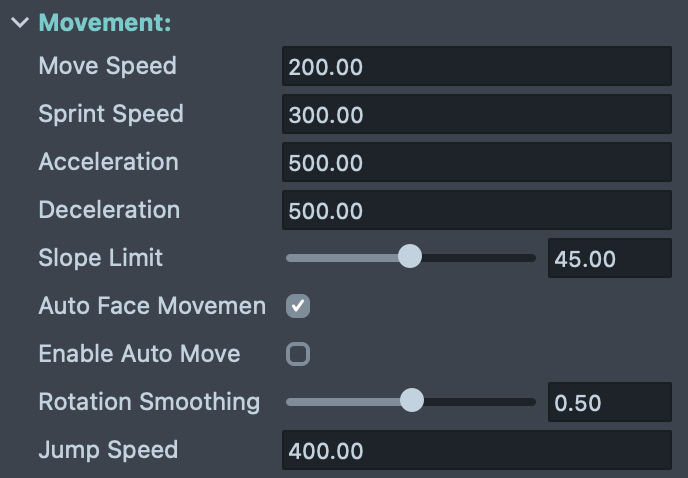
Configure the character's movement behavior:
-
Move Speed: Controls the base movement speed of the character in units per second.
-
Sprint Speed: Controls the character's speed when sprinting is enabled. This should typically be higher than the Move Speed to provide a speed boost.
-
Acceleration: Determines how quickly the character reaches full speed when starting to move.
-
Deceleration: Defines how quickly the character slows down.
-
Jump Speed: Controls the initial upward velocity applied when the character jumps.
-
Slope Limit: Sets the maximum angle (in degrees) of slopes the character can walk up. Steeper slopes beyond this limit will be treated as walls, preventing the character from climbing unnaturally steep surfaces. Typical values range from 30 to 60 degrees.
-
Auto Face Movement Direction: When enabled, the character automatically rotates to face the direction of movement. Disable this if you want to control the character's facing direction independently of movement (e.g., strafing or moving backwards while facing forward).
-
Rotation Smoothing: Controls how smoothly the character rotates towards the movement direction when Auto Face Movement Direction is enabled. Values range from 0 to 1, where 0 means instant rotation and higher values create a smoother, more gradual turning animation.
-
Enable Auto Move: When enabled, the character automatically moves forward in its current facing direction without requiring input. This is useful for endless runner-style games or auto-scrolling gameplay where the player only controls lateral movement or jumping.
Input Control
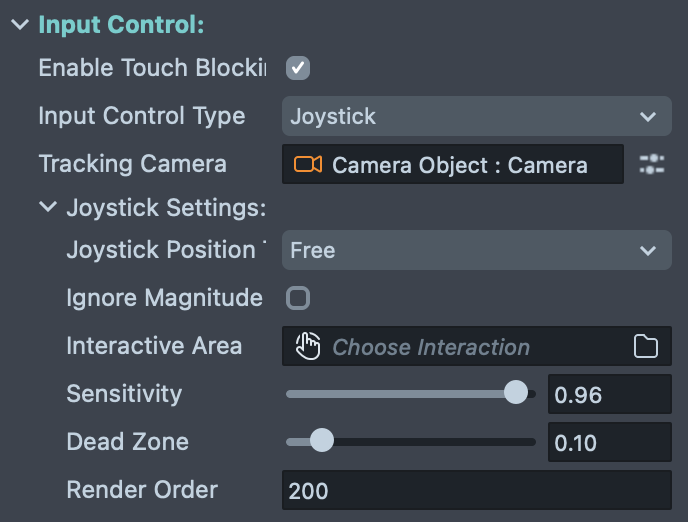
Configure how the player controls the character:
-
Enable Touch Blocking: Disables Snapchat gesture controls that may conflict with game input.
-
Input Control Type: Choose how the character receives movement input:
- Joystick: Creates an on-screen joystick for touch-based movement control. This is the recommended option for most mobile games as it provides intuitive touch controls.
- None: Disables automatic input handling, allowing you to manually control the character through scripting using the
move()API. Use this for custom input systems or AI-controlled characters. Use this option to control the character via the Input Action Component.
-
Tracking Camera: Reference to the Camera object that renders the character. This is required when using Joystick input, as the movement direction is calculated relative to the camera's orientation. The character will move in screen-space directions based on this camera's view.
-
Joystick Settings (available when Input Control Type is set to Joystick):
-
Joystick Position: Determines where the joystick appears on screen:
- Free: The joystick appears wherever the player first touches the screen, providing flexible control placement
- Left: Fixed position on the left side of the screen
- Right: Fixed position on the right side of the screen
- Custom: Allows you to specify a custom parent object and interactive area (requires setting Interactive Area and Joystick Parent fields)
-
Ignore Magnitude: When enabled, the character moves at constant speed regardless of how far the joystick is pushed. When disabled, the character's speed varies based on joystick displacement.
-
Interactive Area: (For Custom joystick position) The SceneObject with an Interaction Component that defines the touchable region where the joystick can be activated.
-
Joystick Parent: (For Custom joystick position) The SceneObject with a ScreenTransform that acts as the parent container for the joystick visual.
-
Sensitivity: Controls how responsive the character is to joystick input. Higher values make the character respond more strongly to smaller joystick movements. Lower values create a more gradual response.
-
Dead Zone: Defines the size of the central region where joystick movements are ignored. Higher values create a larger "neutral" zone. Range: 0.0 to 1.0 (typically 0.05 to 0.2).
-
Render Order: Controls the rendering layer of the joystick UI. Higher values render on top of lower values. Use this to ensure the joystick appears above or below other UI elements as needed.
-
-
Jump settings:
- Multi Jump Count: Sets the number of consecutive jumps the character can perform before needing to touch the ground again. A value of 1 allows a single jump, while higher values enable double jumps or more.
- Jump Buffer Time (milliseconds): If a jump input is received shortly before landing, this setting allows the jump input to be "saved" and executed immediately upon landing. This improves responsiveness by forgiving slightly early jump inputs.
- Coyote Time (milliseconds): Allows the character to still jump for a brief moment after leaving the ground. This creates a more forgiving jump mechanic by allowing jumps shortly after stepping off a ledge.
Physics Settings
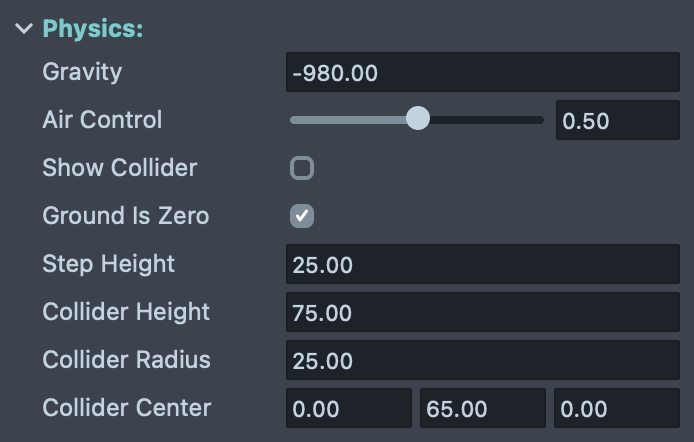
Configure the character's physics behavior and collision properties:
-
Gravity: Controls the constant force applied to the character when not grounded. The default value is -980.00, which creates a downward force (negative Y direction) simulating Earth's gravity in cm/s².
-
Air Control: Determines how much control the player has over the character's movement while airborne (jumping or falling). Values range from 0.0 to 1.0.
-
Show Collider: When enabled, makes the character's collision capsule visible in the scene for debugging purposes. This helps visualize the character's collision boundaries and troubleshoot collision issues during development.
-
Ground Is Zero: When enabled, creates an infinite virtual ground plane at Y=0. This is ideal for quick prototyping and testing without needing to create floor colliders. Disable this when you want to use custom ground surfaces, platforms, or when your game requires the character to fall below Y=0.
-
Step Height: Defines the maximum height (in units) of obstacles the character can automatically step over without jumping. This creates smoother movement over small obstacles like stairs or curbs. Typical values range from 10 to 30 units depending on your scene scale.
-
Collider Height: Sets the length of the character's capsule collider. This should roughly match your character's height to ensure accurate collision detection. Adjust this value if your character model is taller or shorter than average.
-
Collider Radius: Sets the radius of the character's capsule collider. This determines how wide the collision boundary is around the character. Increase this value for larger characters.
-
Collider Center: Defines the offset of the capsule collider relative to the character's transform position. Use this to adjust the vertical position of the collider (Y value) if your character's pivot point is not at their feet, or to fine-tune the collision boundaries in any direction (X, Y, Z).
Movement Animations
The Character Controller includes a built-in animation system that automatically blends between different movement states based on the character's speed and grounded state. This system works seamlessly with Bitmoji 3D animations and custom character rigs.
To use the default Bitmoji animations, disable the 'Adapt to Mixamo' option in the Bitmoji 3D Component.
The default animations and animations created in the Bitmoji Suite don't work with Mixamo rigs.
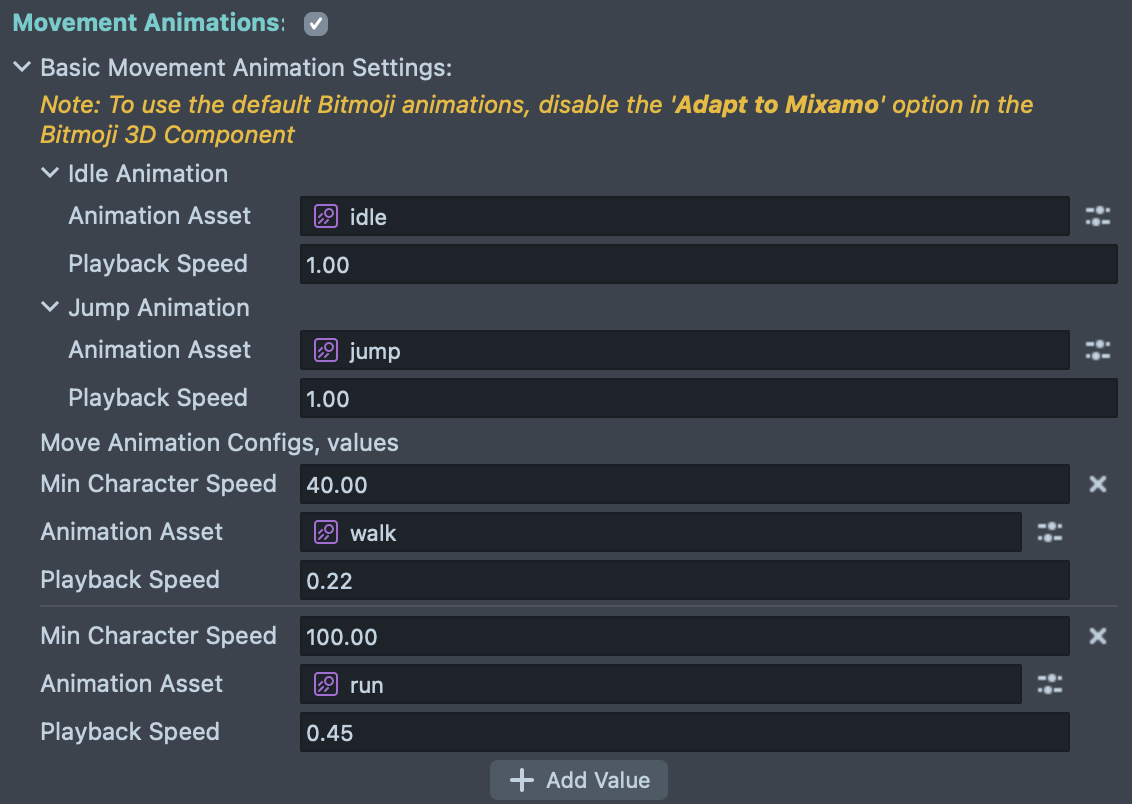
Basic Movement Animation Settings:
Configure animations for different movement states:
-
Idle Animation: Played when the character is stationary and grounded
- Animation Asset: The animation clip to play (e.g., "idle")
- Playback Speed: Controls how fast the animation plays (default: 1.00)
-
Jump Animation: Played when the character jumps
- Animation Asset: The animation clip to play (e.g., "jump")
- Playback Speed: Controls how fast the animation plays (default: 1.00)
Move Animation Configurations:
You can define multiple movement animations that trigger based on character speed, allowing smooth transitions from walking to running:
-
Min Character Speed: The minimum speed threshold required to trigger this animation. The Character Controller automatically selects the appropriate animation based on the character's current speed.
-
Animation Asset: The animation clip for this speed range (e.g., "walk" or "run")
-
Playback Speed: Controls the animation playback rate. You can adjust this to match the animation speed to the character's movement speed for realistic foot placement.
Example Configuration:
The default setup includes two movement animations:
- Walk Animation: Triggers at speeds above 40.00 units/second
- Run Animation: Triggers at speeds above 100.00 units/second
In the default setup, the character can't move slower than walking speed.
You can add additional animation states by clicking the "+ Add Value" button to create animations for different speed ranges (e.g., jog, sprint).
Animation Blending:
The Character Controller automatically handles transitions between animation states, creating smooth blends when the character changes its state.
Actions
The Actions system allows you to trigger custom animations and behaviors on the character, such as victory celebrations, attacks, emotes, or any special moves.
Action Configurations:
Each action can be configured with the following settings:
-
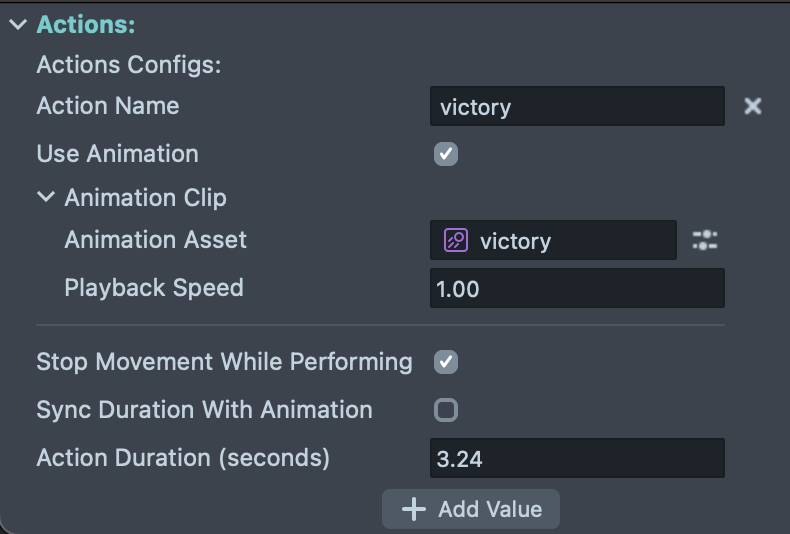
Action Name: A unique identifier for the action that you'll use to trigger it via script (e.g., "victory", "attack", "dance")
-
Use Animation: When enabled, plays a custom animation clip during the action. Disable this if you want to create an action that only affects movement or other behaviors without changing the animation.
Animation Clip Settings (when Use Animation is enabled):
-
Animation Asset: The animation clip to play when this action is triggered (e.g., a victory animation, attack animation, or emote)
-
Playback Speed: Controls how fast the animation plays. Values above 1.0 speed up the animation, while values below 1.0 slow it down (default: 1.00)
Action Behavior:
-
Stop Movement While Performing: When enabled, the character cannot move while the action is playing. This is useful for actions where the character should remain stationary (e.g., victory poses, emotes). Disable this to allow movement during the action (e.g., a running attack).
-
Sync Duration With Animation: When enabled, the action duration automatically matches the length of the animation clip. When disabled, you can manually set a custom duration using the Action Duration field.
-
Action Duration (seconds): Sets how long the action lasts. This field is only editable when "Sync Duration With Animation" is disabled, allowing you to create actions with custom durations that differ from the animation length.
Adding Actions:
Click the "+ Add Value" button to create additional action configurations. You can define as many actions as your gameplay requires.
Triggering Actions via Script:
To trigger an action from your script, use the startAction(actionName: string): void API method with the action name:
- JavaScript
- TypeScript
// Trigger a victory action
script.characterController.startAction('victory');
import { CharacterController } from 'Character Controller.lsc/Character Controller/Character Controller';

@component
export class CharacterControllerExample extends BaseScriptComponent {
  @input
  characterController: CharacterController;

  onAwake() {
    this.characterController.startAction('victory');
  }
}
You can also start an action using the Input Action Component and CharacterController's event system to bind actions to specific input events.
Actions are ideal for:
- Victory celebrations or defeat animations
- Attack moves or combat abilities
- Emotes and character expressions
- Context-specific animations (climbing, pushing, interacting)
- Cutscene-like sequences where you need precise control over character behavior
Character Events
The Character Events system allows you to respond to gameplay events by triggering actions, behaviors, or custom scripts. This powerful system connects physics interactions, game triggers, and character actions without writing code.
Event Types:
The Character Controller supports multiple event types:
- Physics Overlap Event: Triggered when the character enters, stays in, or exits an overlap with a Physics Body or Physics Collider component
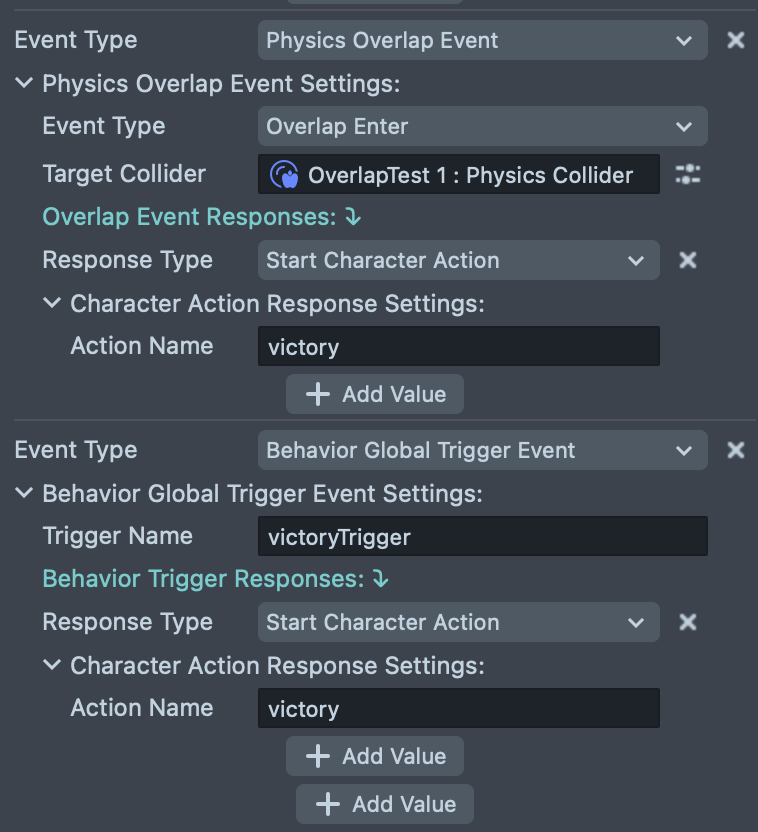
- Behavior Global Trigger Event: Triggered by custom behavior triggers you define in your game logic
Configuring Events:
Each event can be configured with specific settings depending on the event type:
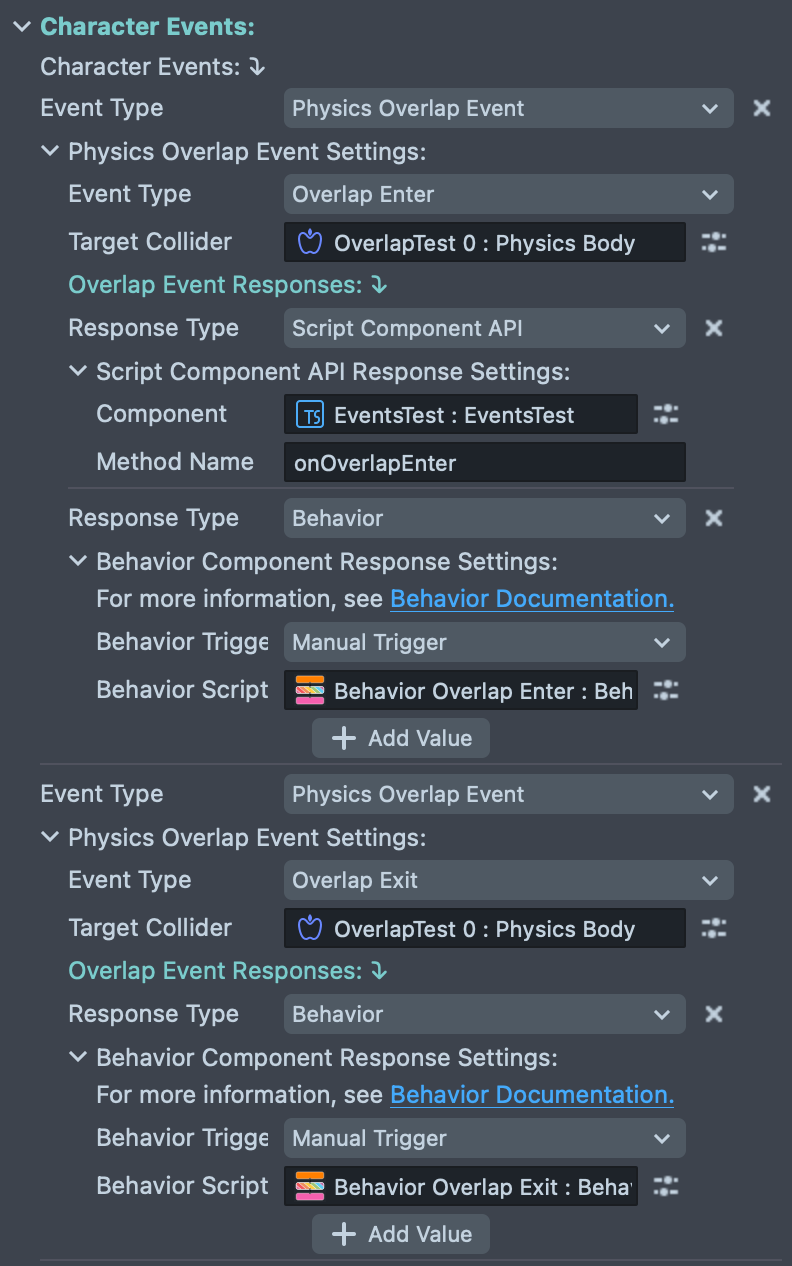
Physics Overlap Event Settings:
-
Event Type: Choose the specific overlap event to listen for:
- Overlap Enter: Triggers when the character first enters an overlap
- Overlap Stay: Triggers continuously while the character remains in an overlap
- Overlap Exit: Triggers when the character leaves an overlap
-
Target Collider: Reference to the Physics Body or Physics Collider that will trigger this event when the character overlaps with it
Behavior Global Trigger Event Settings:
- Trigger Name: A unique identifier for the trigger that can be activated from Behavior scripts or other game systems
Event Responses:
When an event is triggered, you can configure multiple responses. Each response can be one of the following types:
-
Start Character Action: Automatically triggers a character action by name (e.g., start a victory animation when entering a finish zone)
- Action Name: The name of the action to perform (must match an action defined in the Actions section)
-
Script Component API: Calls a method on a script component
- Component: Reference to the script component
- Method Name: The method to call on the component
-
Behavior: Triggers a behavior script
- Behavior Trigger: Manual trigger type
- Behavior Script: Reference to the behavior to execute
Adding Events and Responses:
- Click "+ Add Value" under Character Events to create new event configurations
- Click "+ Add Value" under Event Responses to add multiple responses to a single event
- You can have multiple events of different types, each with their own set of responses
Example Use Cases:
- Finish Line: Use a Physics Overlap Event with "Overlap Enter" to detect when the character reaches the finish line, then trigger a "victory" action
- Collectibles: Use Physics Overlap Events to detect when the character collects items and trigger scoring behaviors
- Damage Zones: Use Physics Overlap Events with "Overlap Stay" to continuously damage the character in hazardous areas
- Interactive Objects: Use Physics Collision Events to detect when the character touches interactive objects
- Game State Changes: Use Behavior Global Trigger Events to respond to custom game events like level completion or power-up activation
This event system eliminates the need for manual scripting in many common gameplay scenarios, making it easier to create interactive game mechanics through visual configuration.
Logging Settings
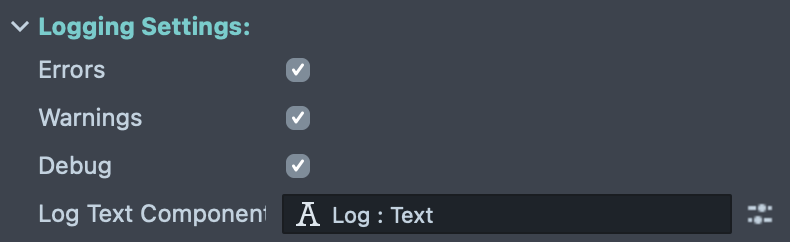
The Logging Settings allow you to control debug output from the Character Controller component, helping you troubleshoot issues and monitor character behavior during development.
Log Levels:
Enable or disable different types of log messages:
-
Errors: Logs critical errors and issues that prevent the Character Controller from functioning correctly. It's recommended to keep this enabled during development to catch problems early.
-
Warnings: Logs potential issues or unexpected behavior that might not break functionality but could indicate configuration problems or edge cases.
-
Debug: Logs detailed information about the character's state, movement, collisions, and internal operations. Enable this when you need verbose output to diagnose specific issues or understand the character's behavior in detail.
Log Text Component:
- Log Text Component: Optional reference to a Text component where log messages will be displayed in real-time within your Lens. This is useful for on-device debugging when you want to see Character Controller status messages directly on screen without using the Lens Studio logger.
Keyboard Testing
When testing your Lens inside Lens Studio, you can use keyboard controls to move the character, for example you can map the WASD or arrow keys to movement directions and the spacebar to jump by using Input Action.
If you're using Bitmoji Player Package, the default input action setup already includes keyboard bindings for movement and jumping when testing in Lens Studio. Otherwise, you can use the Input Action component to create custom input mappings for keyboard testing by following the component documentation.
Environment Setup
Ground Setup:
By default, Ground Is Zero is enabled in the Physics settings, creating an infinite floor plane at Y=0. This is ideal for quick prototyping. Disable this option if you want to create custom ground surfaces and platforms.
Adding Physics Objects:
To create an interactive environment, add physics components to your scene objects:
- Physics Body Component: For movable/interactive objects (boxes, balls, pushable items)
- Physics Collider Component: For immovable static objects (walls, floors, platforms, barriers)
The Character Controller supports only one Physics World Component per project for proper collision handling. Ensure you don't have multiple Physics World components in your scene.
Jump Mechanics
By default, the Character Controller allows a single jump, with 100 milliseconds of coyote time and jump buffering for improved responsiveness. You can customize jump behavior in the "Input Control" section of the component settings.
Multi-Jump
Double jumps or multiple consecutive jumps can be enabled by setting the Multi Jump Count to a value greater than 1.
This allows the character to jump multiple times before needing to touch the ground again, allowing it to jump in mid-air.
It can also be adjusted dynamically via the setMultiJumpCount(count: number) API method.
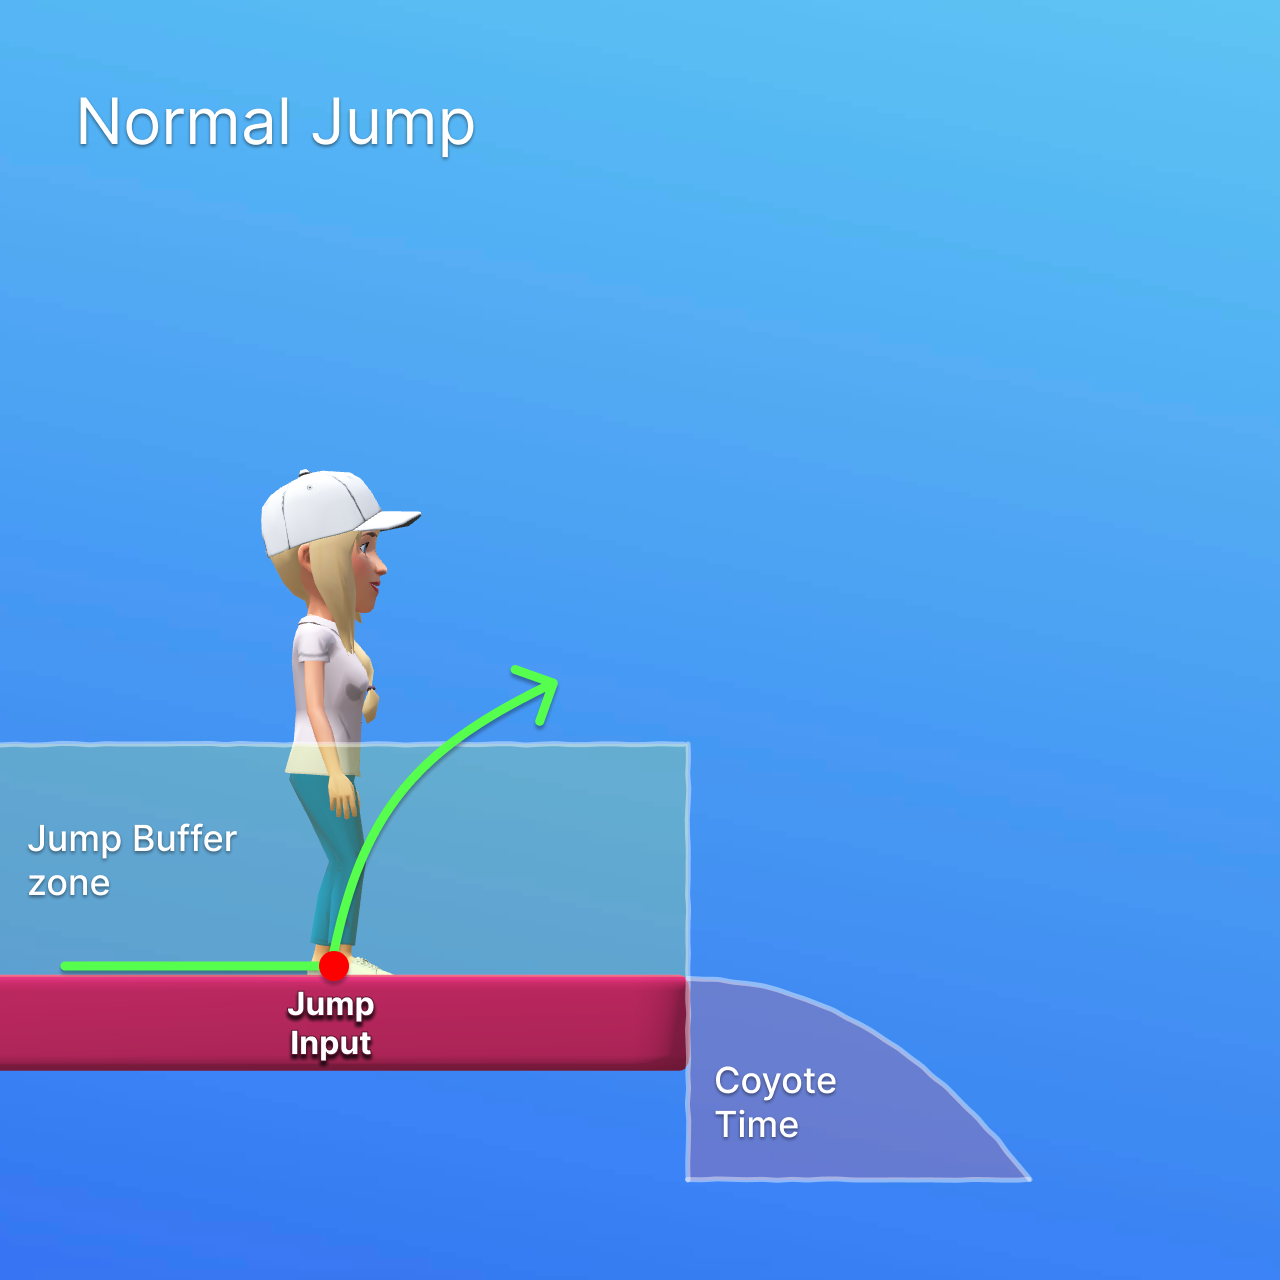
Jump Buffering and Coyote Time
The main goal of jump buffering and coyote time is to make jumping feel more responsive and forgiving for players. It is often used in platformer games to improve the overall gameplay experience.
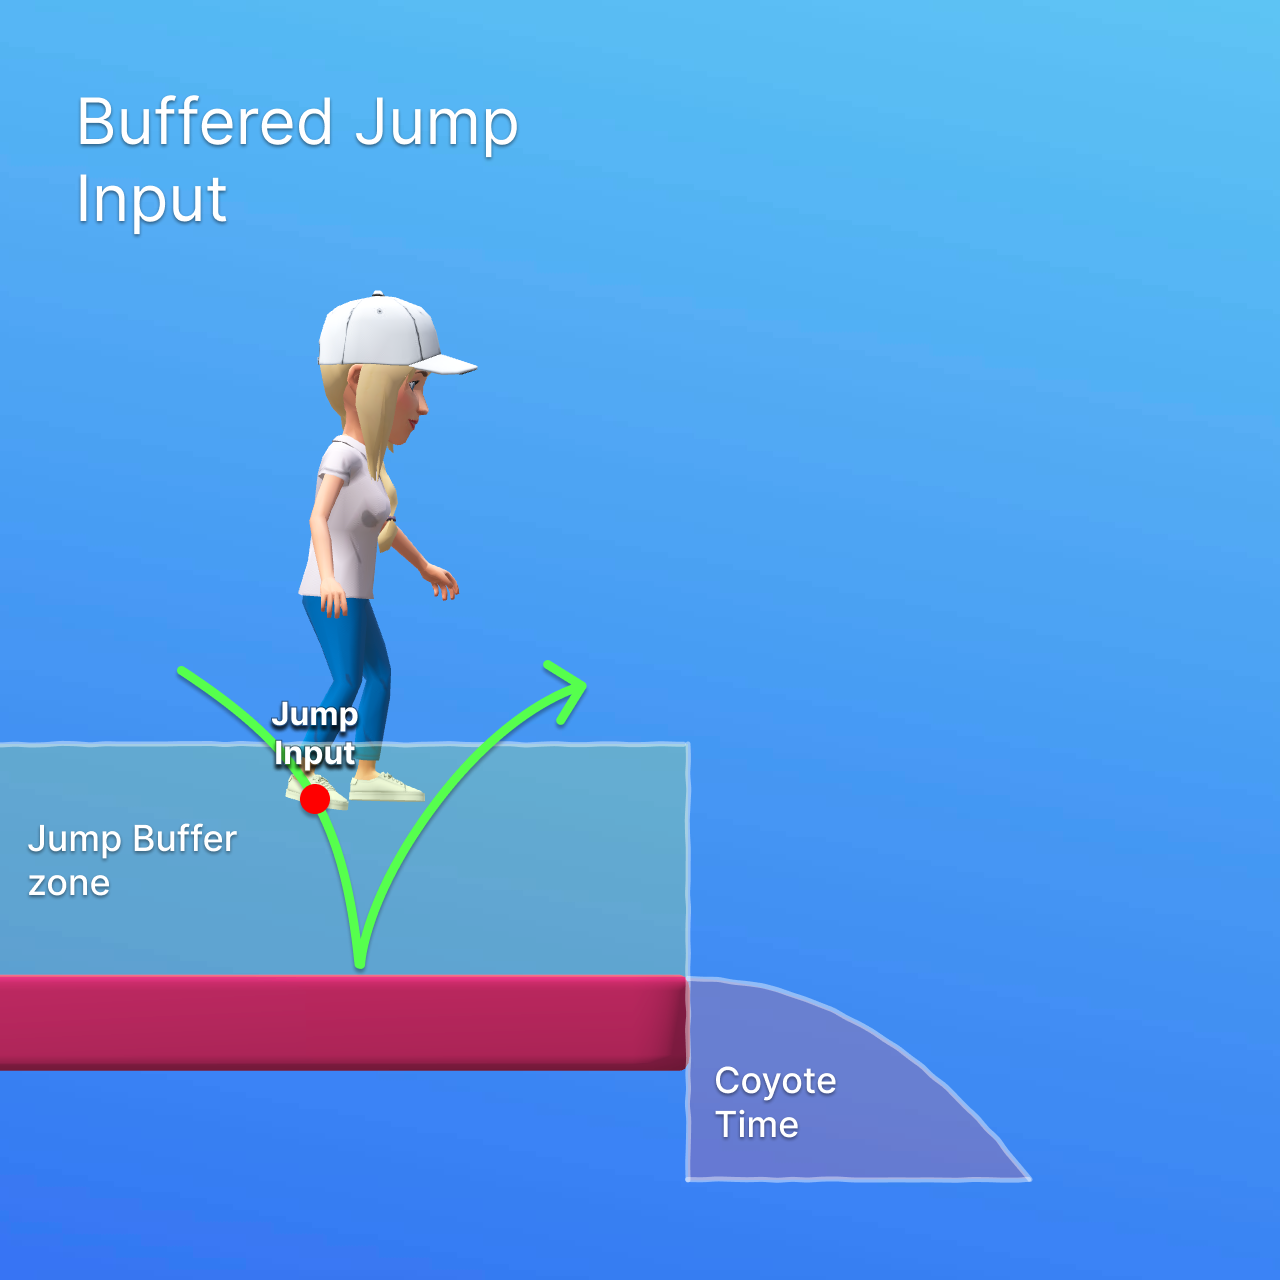
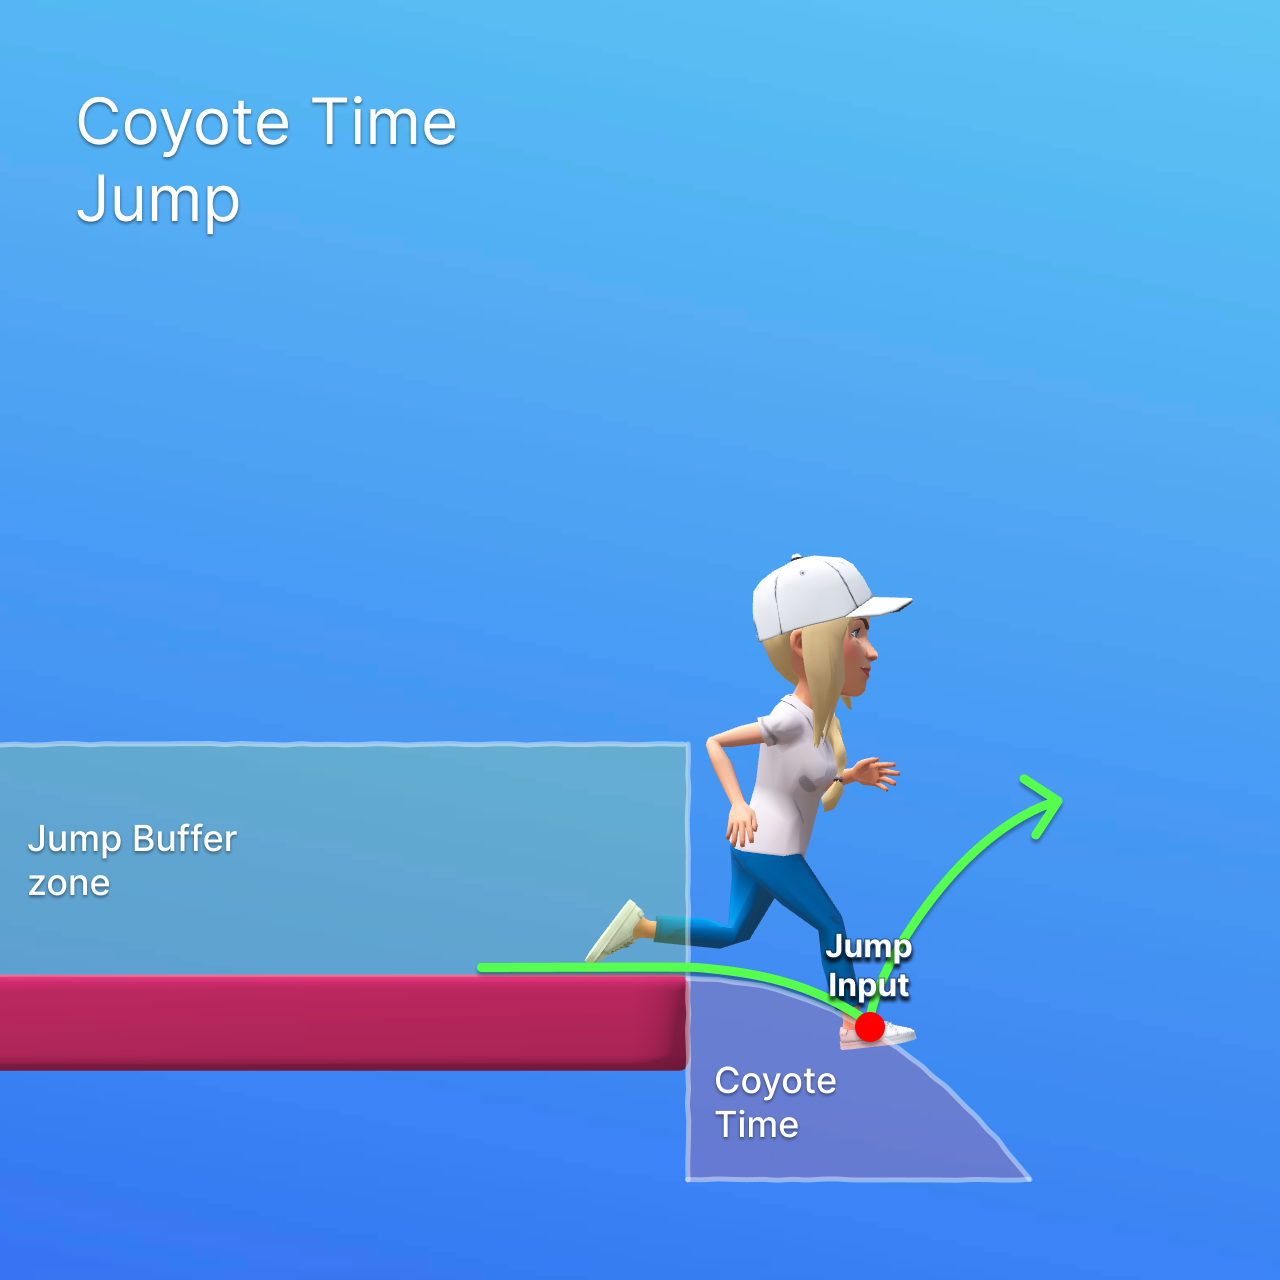
Jump Buffering allows a jump input to be registered slightly before the character lands on the ground, and executes the jump immediately after touching the ground. Coyote Time allows the character to still jump for a short amount of time after leaving the ground (like the ledge of a platform), making it easier to time jumps.
Both settings can be configured in milliseconds via the Jump Buffer Time and Coyote Time fields in the Input Control section of the Character Controller component.
They can also be adjusted dynamically via the setJumpBufferTime(milliseconds: number) and setJumpCoyoteTime(milliseconds: number) API methods.
Set either value to 0 to disable the respective feature.
If the player presses the jump button while the character is grounded or has multiple jumps available, the character will jump immediately. This is the standard jump behavior.
If the player presses the jump button shortly before landing (within the jump buffer time), the jump will be executed once the character touches the ground. This is controlled by the jump buffering setting.
If the player presses the jump button shortly after leaving the ground (within the coyote time), the jump will still be executed. This is controlled by the coyote time setting.
Component API
| Name | Description |
|---|---|
| move(direction: vec3): void | Moves the character in the specified direction. The Y component is ignored. Must be called each frame to maintain movement. To use this API for manual control, set Input Control Type to None. |
| stopMovement(): void | Immediately stops all character movement by resetting velocity and direction. |
| setPosition(position: vec3): void | Teleports the character to a specific world position instantly. Also resets ground detection state. |
| getPosition(): vec3 | Returns the current world position of the character. |
| setRotation(rotation: quat): void | Sets the character's facing rotation. Only rotates around the Y axis (yaw). Pitch and roll components are ignored. |
| getRotation(): quat | Returns the character's current rotation quaternion. |
| getDirection(): vec3 | Returns the current movement direction vector (Y component is always 0). |
| getVelocity(): vec3 | Returns the character's current velocity vector in units per second. Includes both horizontal and vertical (gravity-affected) components. |
| getMoveVelocity(): vec3 | Returns the character's current horizontal movement velocity (excludes gravity). This is the velocity from movement input only, without vertical gravity component. |
| jump(): void | Makes the character jump if currently grounded. Applies initial upward velocity based on jumpSpeed setting and triggers jump animation. |
| setSprintEnabled(enabled: boolean): void | Enables or disables sprint mode. When enabled, uses sprintSpeed instead of moveSpeed and ignores targetSpeedModifier. |
| isSprinting(): boolean | Returns true if sprint mode is currently active. |
| setMoveSpeed(speed: number): void | Sets the character's base walking speed in units per second. Must be non-negative. |
| getMoveSpeed(): number | Returns the current base walking speed. |
| setSprintSpeed(speed: number): void | Sets the character's sprint speed in units per second. Must be non-negative. |
| getSprintSpeed(): number | Returns the current sprint speed. |
| isGrounded(): boolean | Returns true if the character is currently on the ground. |
| isMoving(): boolean | Returns true if the character is currently in motion based on actual velocity. |
| setAutoFaceMovement(enabled: boolean): void | Enables or disables automatic rotation to face the direction of movement. Smoothing is controlled by the rotationSmoothing setting. |
| getAutoFaceMovement(): boolean | Returns whether automatic facing toward movement direction is enabled. |
| setAcceleration(value: number): void | Sets how quickly the character reaches full speed in units per second squared. Must be non-negative. |
| getAcceleration(): number | Returns the current acceleration rate. |
| setDeceleration(value: number): void | Sets how quickly the character slows down when input stops, in units per second squared. Must be non-negative. |
| getDeceleration(): number | Returns the current deceleration rate. |
| setMultiJumpCount(count: number): void | Sets the number of jumps the character can perform after touching the ground. 0 = no jumping, 1 = single jump, higher values enable multi-jump (e.g., 2 = double jump). |
| getMultiJumpCount(): number | Returns the number of jumps the character can perform after touching the ground. 0 means no jumps allowed, 1 means a single jump, etc. |
| getAvailableJumps(): number | Returns the number of remaining jumps available before needing to touch the ground. |
| setJumpBufferTime(milliseconds: number): void | Sets the duration in milliseconds during which a jump input will be saved while not grounded. Allows jumps to be registered slightly before landing. Set to 0 to disable. |
| getJumpBufferTime(): number | Returns the jump buffer time in milliseconds. Returns 0 if disabled. |
| setJumpCoyoteTime(milliseconds: number): void | Sets the duration in milliseconds after leaving the ground during which a jump input will still result in a jump. "Coyote time" allows for more forgiving jump timing. Set to 0 to disable. |
| getJumpCoyoteTime(): number | Returns the coyote time in milliseconds. Returns 0 if disabled. |
| setLockXAxis(enabled: boolean): void | Locks or unlocks movement along the X axis. When locked, all X-axis movement and velocity is prevented. |
| getLockXAxis(): boolean | Returns whether movement along the X axis is currently locked. |
| setLockYAxis(enabled: boolean): void | Locks or unlocks movement along the Y axis. When locked, all Y-axis movement and velocity is prevented, including gravity. |
| getLockYAxis(): boolean | Returns whether movement along the Y axis is currently locked. |
| setLockZAxis(enabled: boolean): void | Locks or unlocks movement along the Z axis. When locked, all Z-axis movement and velocity is prevented. |
| getLockZAxis(): boolean | Returns whether movement along the Z axis is currently locked. |
| setShowCollider(value: boolean): void | Enables or disables debug visualization of the character's capsule collider. |
| getShowCollider(): boolean | Returns whether the character's collider debug visualization is enabled. |
| getCollider(): ColliderComponent | Returns the character's ColliderComponent for advanced collision control and physics material modification. |
| startAction(actionName: string): void | Triggers a custom action by name. Actions control animation playback and can optionally disable movement during execution. Actions must be pre-configured in the Actions settings. |
| getActiveActions(): Iterable<string> | Returns an iterable collection of currently active action names. Actions become active when started and remain active until completed. |
| isActionActive(actionName: string): boolean | Checks if a specific action is currently active. Returns true if the action is active, false otherwise. |
| setTargetSpeedModifier(modifier: number): void | Sets a multiplier for the target movement speed (0-1 range recommended). Allows for gradual speed changes such as analog stick input. |
| showControls(): void | Shows the input controls (joystick) if input control is configured. |
| hideControls(): void | Hides the input controls (joystick) if input control is configured. |
| enableAutoMovement(): void | Enables automatic forward movement in the character's facing direction. Useful for endless runner or racing games. |
| disableAutoMovement(): void | Disables automatic forward movement and returns control to normal input-based movement. |
| dash(): void | Performs a dash action, allowing short bursts of horizontal movement along the facing direction. Dash behavior is configured in the Dash settings. |
| isDashing(): boolean | Returns true if the character is currently performing a dash. |
| getDashCollisionFilter(): DashCollisionFilter | Returns the Dash collider filter used to determine which colliders can be dashed through. Use this to configure dash interactions with specific physics objects. |
| getDashTimeLeft(): number | Returns the remaining time in seconds for the current dash. Returns 0 if not dashing. Useful for displaying dash cooldown timers or dash duration indicators. |
API Events
| Event Name | Type | Description |
|---|---|---|
| onCollisionEnter | event1<CollisionEnterEventArgs, void> | Triggered when the character's collider begins colliding with another collider. Provides collision details including contact points and the other collider. |
| onCollisionStay | event1<CollisionEnterEventArgs, void> | Triggered each frame while the character remains in collision with another collider. Fires continuously during sustained contact. |
| onCollisionExit | event1<CollisionEnterEventArgs, void> | Triggered when the character's collider stops colliding with another collider. Fired once when collision ends. |
| onOverlapEnter | event1<OverlapEnterEventArgs, void> | Triggered when the character enters an overlap with a collider or physics body component. Overlaps don't generate collision responses but can detect presence. |
| onOverlapStay | event1<OverlapEnterEventArgs, void> | Triggered each frame while the character remains inside an overlap with a collider or physics body component. Fires continuously while overlapping. |
| onOverlapExit | event1<OverlapEnterEventArgs, void> | Triggered when the character exits an overlap with a collider or physics body component. Fired once when overlap ends. |
| onActionStarted | Event<string> | Triggered when a custom action is started via startAction(). The event data contains the name of the action that was started. |
| onJumpStarted | Event<void> | Triggered when the character performs a jump. Fires for all jumps including multi-jumps. |
| onDashStarted | Event<void> | Triggered when the character performs a dash. Fires once at the start of the dash action. |
| onDashedThroughCollider | Event<DashedThroughColliderEvent> | Triggered when the dash passes through a collider based on the dash collision filter settings. Provides information about the collider that was dashed through. |
Moving the Character Toward Touch Position
Use the following example to move the character toward the most recent screen touch position.
Make sure that Input Control Type on the Character Controller is set to None, otherwise the call to move() will be ignored.
- JavaScript
- TypeScript
// Move the character towards the most recent touch position on the screen.

//@input Component.Camera camera;
//@input Component.ScriptComponent characterController
//@input float speed = 25
//@input float minDist = 25

let targetPos = null;

script.createEvent('UpdateEvent').bind(() => handleUpdate());
script.createEvent('TouchStartEvent').bind((e) => handleTouch(e));
script.createEvent('TouchMoveEvent').bind((e) => handleTouch(e));

function handleUpdate() {
  if (targetPos) {
    const charPos = script.characterController
      .getTransform()
      .getWorldPosition();
    const offset = targetPos.sub(charPos);

    if (offset.length <= script.minDist) {
      script.characterController.stopMovement();
      targetPos = null;
    } else {
      script.characterController.move(offset);
    }
  }
}

function handleTouch(touchEvent) {
  const screenPos = touchEvent.getTouchPosition();
  const startPos = script.camera.screenSpaceToWorldSpace(
    screenPos,
    script.camera.near
  );
  const endPos = script.camera.screenSpaceToWorldSpace(
    screenPos,
    script.camera.far
  );

  const probe = Physics.createGlobalProbe();
  probe.rayCast(startPos, endPos, (hit) => {
    if (hit) {
      targetPos = hit.position;
    }
  });
}
// Move the character towards the most recent touch position on the screen.
import { CharacterController } from 'Character Controller.lsc/Character Controller/Character Controller';

@component
export class MoveCharacterToTouch extends BaseScriptComponent {
  @input
  private readonly camera: Camera;

  @input
  private readonly characterController: CharacterController;

  @input
  @hint('Minimal distance to target position to stop moving')
  private readonly minDist: number = 40;

  private targetPos: vec3 = null;

  protected onAwake() {
    this.createEvent('UpdateEvent').bind(() => this.update());
    this.createEvent('TouchStartEvent').bind((e) => this.handleTouch(e));
    this.createEvent('TouchMoveEvent').bind((e) => this.handleTouch(e));
  }

  private update() {
    if (this.targetPos) {
      const charPos = this.characterController
        .getTransform()
        .getWorldPosition();

      const offset = this.targetPos.sub(charPos);

      if (offset.length <= this.minDist) {
        this.characterController.stopMovement();
        this.targetPos = null;
      } else {
        this.characterController.move(offset);
      }
    }
  }

  private handleTouch(touchEvent: TouchStartEvent | TouchMoveEvent) {
    const screenPos = touchEvent.getTouchPosition();
    const startPos = this.camera.screenSpaceToWorldSpace(
      screenPos,
      this.camera.near
    );
    const endPos = this.camera.screenSpaceToWorldSpace(
      screenPos,
      this.camera.far
    );

    const probe = Physics.createGlobalProbe();
    probe.rayCast(startPos, endPos, (hit) => {
      if (hit) {
        this.targetPos = hit.position;
      }
    });
  }
}
Testing on Device
To preview your Lens in Snapchat, follow the Pairing to Snapchat guide.